50 - Deploy
Deploy
Deploy your ASP.NET Core MVC App
Several ways how to do it
- Full bare metal server
- Virtual server
- App hosting (azure) (deployable directly from Rider)
- Most standardized way – containers – Docker
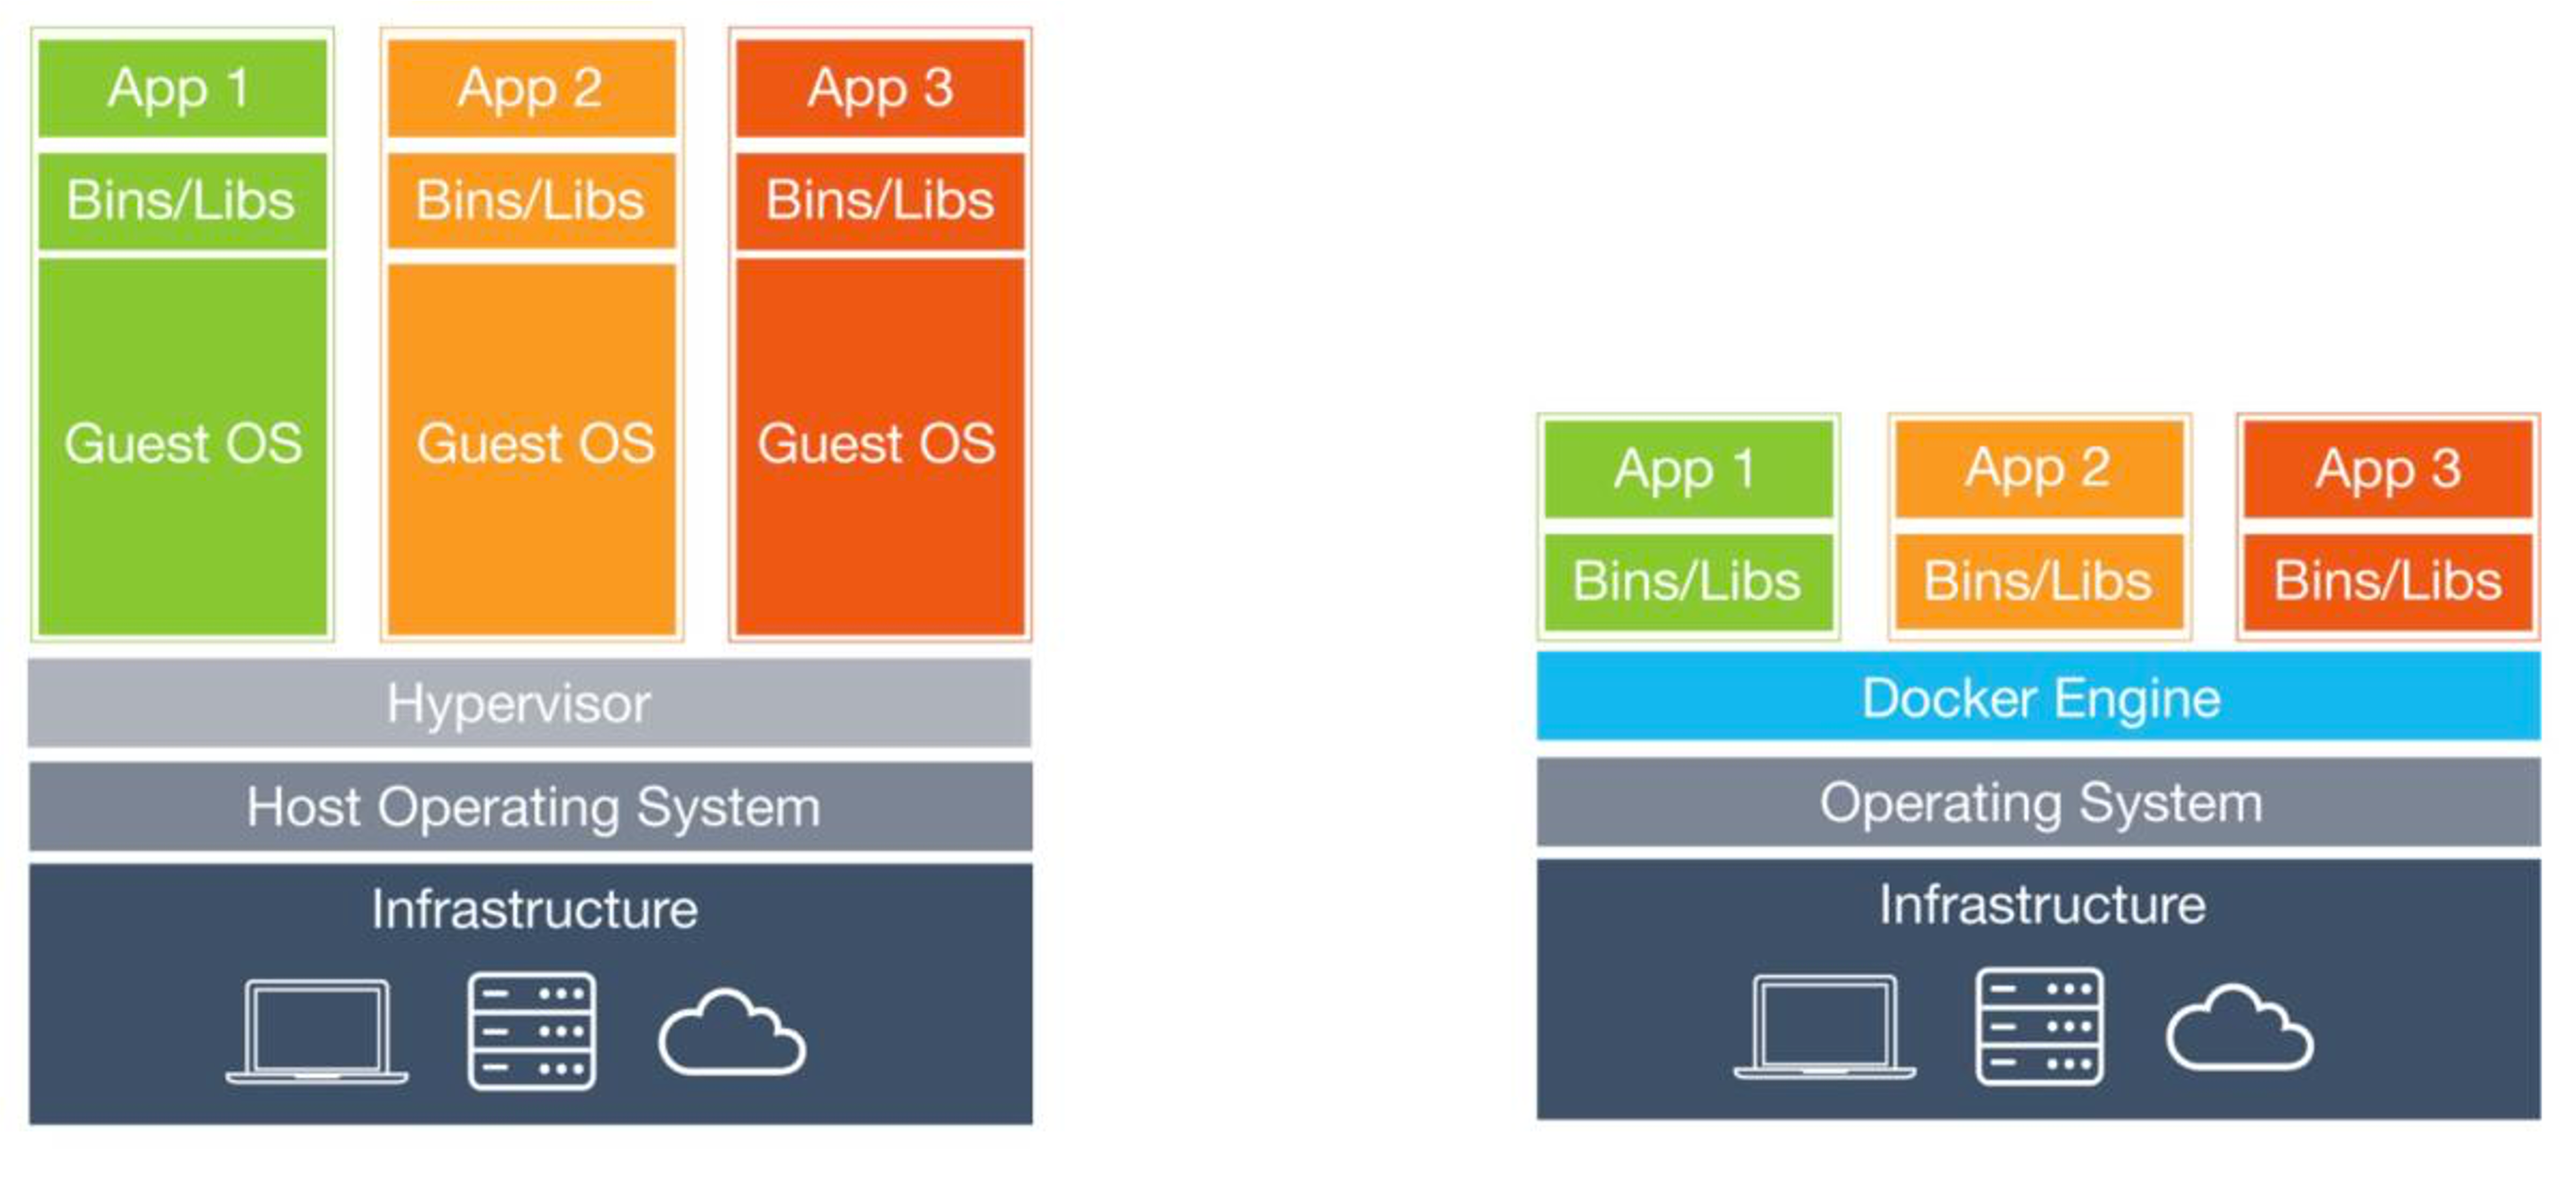
What is Docker?
- Docker is a tool that packages your application together with everything it needs to run – OS libraries, runtime, dependencies, configuration – into a container. This solves the classic "works on my machine" problem – since everything is packaged inside the container, it runs the same way on your laptop, your teammate's laptop, and the production server.
- A container is not a virtual machine – it does not run a separate operating system with its own kernel. Containers share the host's kernel and only isolate the application layer, which makes them much lighter and faster to start. Think of it this way: a VM is like renting an entire apartment (own kitchen, bathroom, everything), while a container is like renting a desk in a coworking space – you get your own isolated workspace but share the building's infrastructure.
- In this course we use Docker to package our built JavaScript apps with an nginx web server into a single container that can be deployed anywhere.
- Containers are ephemeral – when a container is removed, any data inside it is lost. If you need persistent data (databases, uploads), you must use Docker volumes to store data outside the container.
Docker desktop
Download and install docker desktop for your platform (apple silicon is fully supported)
Its free!
When you create a docker image of your app, you need to upload it to somewhere – so hosting can download it from there. Typically, docker hosts do not allow direct uploads! Docker hub is free service to host your public images.
Dockerfile
- Create Dockerfile in solution folder
- It uses two ready-made base images from MS (based on Debian)
sdk:10.0– for building (or :latest)
Full .net core sdkaspnet:10.0– for running (or :latest)
This image only contains .net core and ASP.NET runtime – its smaller
FROM mcr.microsoft.com/dotnet/sdk:latest AS build
WORKDIR /app
# copy csproj and restore as distinct layers
COPY *.sln .
# copy ALL the projects
COPY WebApp/*.csproj ./WebApp/
RUN dotnet restore
# copy everything else and build app
# copy all the projects
COPY WebApp/. ./WebApp/
WORKDIR /app/WebApp
RUN dotnet publish -c Release -o out
FROM mcr.microsoft.com/dotnet/aspnet:latest AS runtime
WORKDIR /app
COPY /app/WebApp/out ./
ENTRYPOINT ["dotnet", "WebApp.dll"]
.dockerignore
To keep size even more down and control the bin/obj directory problems - add .dockerignore
**/bin
**/obj
**/out
**/.vscode
**/.vs
.dotnet
.Microsoft.DotNet.ImageBuilder
DB connections strings
Take care of DB strings in image.
- In Dockerfile
FROM mcr.microsoft.com/dotnet/aspnet:latest AS runtime
ENV ConnectionStrings:SqlServerConnection="Server=postgres,5432;..."
- or set env variables externally when image is starting up
dockerfile full example
# aluskiht
FROM mcr.microsoft.com/dotnet/sdk:latest AS build
# tee kataloog /app valmis ja vaheta aktiivne kataloog sinna
WORKDIR /app
# kopeeri solution hetke hosti kataloogist konteineri aktiivsesse kataloogi
# kustkohast-> kuhu
COPY *.sln .
# kopeeri kõik projektid solutionist
COPY Base.BLL/*.csproj ./Base.BLL/
COPY Base.BLL.Contracts/*.csproj ./Base.BLL.Contracts/
COPY Base.Contracts/*.csproj ./Base.Contracts/
COPY Base.DAL.Contracts/*.csproj ./Base.DAL.Contracts/
COPY Base.DAL.EF/*.csproj ./Base.DAL.EF/
COPY Base.Domain/*.csproj ./Base.Domain/
COPY Base.Helpers/*.csproj ./Base.Helpers/
COPY Base.Resources/*.csproj ./Base.Resources/
COPY App.BLL/*.csproj ./App.BLL/
COPY App.BLL.Contracts/*.csproj ./App.BLL.Contracts/
COPY App.BLL.DTO/*.csproj ./App.BLL.DTO/
COPY App.DAL.Contracts/*.csproj ./App.DAL.Contracts/
COPY App.DAL.DTO/*.csproj ./App.DAL.DTO/
COPY App.DAL.EF/*.csproj ./App.DAL.EF/
COPY App.DTO/*.csproj ./App.DTO/
COPY App.Domain/*.csproj ./App.Domain/
COPY App.Resources/*.csproj ./App.Resources/
COPY App.Tests/*.csproj ./App.Tests/
COPY WebApp/*.csproj ./WebApp/
# taasta nuget paketid konteineris
RUN dotnet restore
# kopeeri kogu lähtekood ja ehita rakendus
COPY Base.BLL/. ./Base.BLL/
COPY Base.BLL.Contracts/. ./Base.BLL.Contracts/
COPY Base.Contracts/. ./Base.Contracts/
COPY Base.DAL.Contracts/. ./Base.DAL.Contracts/
COPY Base.DAL.EF/. ./Base.DAL.EF/
COPY Base.Domain/. ./Base.Domain/
COPY Base.Helpers/. ./Base.Helpers/
COPY Base.Resources/. ./Base.Resources/
COPY App.BLL/. ./App.BLL/
COPY App.BLL.Contracts/. ./App.BLL.Contracts/
COPY App.BLL.DTO/. ./App.BLL.DTO/
COPY App.DAL.Contracts/. ./App.DAL.Contracts/
COPY App.DAL.DTO/. ./App.DAL.DTO/
COPY App.DAL.EF/. ./App.DAL.EF/
COPY App.DTO/. ./App.DTO/
COPY App.Domain/. ./App.Domain/
COPY App.Resources/. ./App.Resources/
COPY App.Tests/. ./App.Tests/
COPY WebApp/. ./WebApp/
RUN dotnet publish -c Release -o out
# tekita uus image
FROM mcr.microsoft.com/dotnet/aspnet:latest AS runtime
WORKDIR /app
EXPOSE 8080
COPY /app/out ./
ENV ConnectionStrings:DefaultConnection="Host=host.docker.internal;Port=5432;Database=contactbase;Username=postgres;Password=postgres"
ENTRYPOINT ["dotnet", "WebApp.dll"]
Build image
-
Build your app into docker image
> docker build -t webapp . -
Run it locally via docker (set envs for db if needed)
> docker run --name webapp_docker --rm -it -p 8000:80 webapp-p 8000:80– map port 8000 (local machine) to docker port 80 ---name webapp_docker– name of instance --it– interactive (can close down with ctrl-c) ---rm- clean resources after closing down
Open browser to http://localhost:8000/
Publish image (if needed)
-
Tag your docker image (needed for publishing)
> docker tag webapp akaver/webapp:test -
Publish your docker image to registry
> docker login -u [username] -p [password]
> docker push akaver/webapp:test -
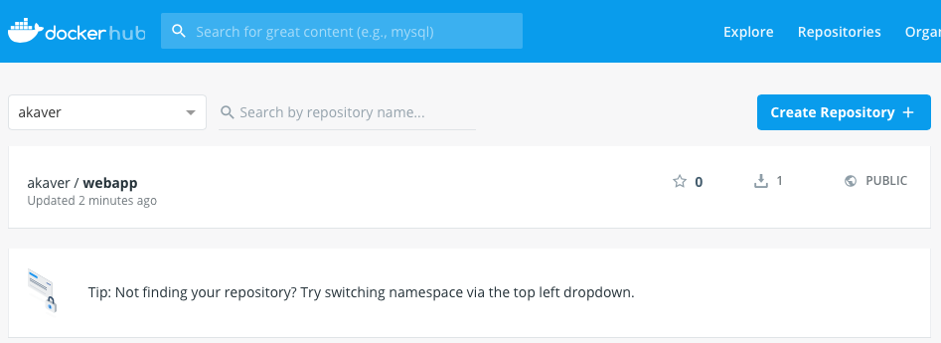
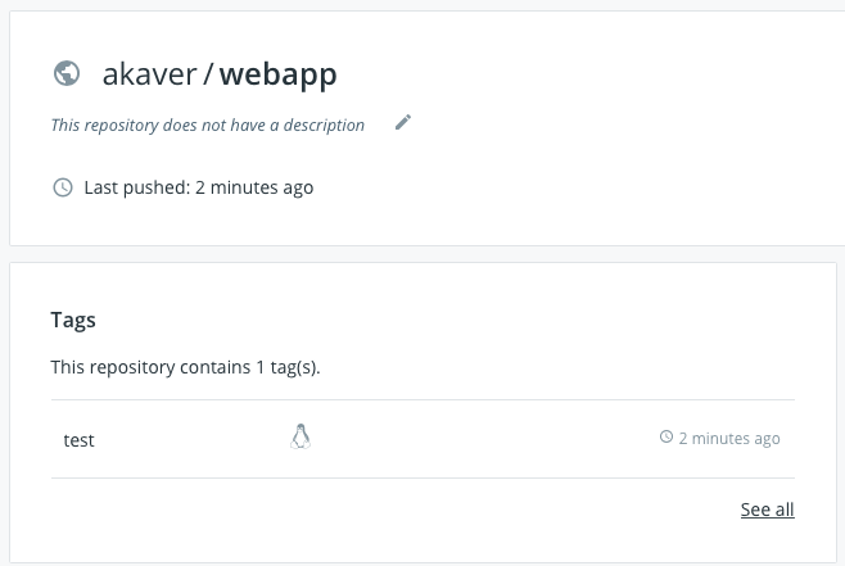
Check your image in Docker Hub
Now you are ready to deploy your dockerized app to cloud - azure, aws, etc.
Docker compose
But usually you need to have several containers running together (db, app, redis, rabbit mq, etc) - for that you need to use docker-compose.
Docker compose allows you to define all your containers in one file and run them together, using shared internal network.
When running in cloud provider dockerized approach - they usually have managed services for db, redis, rabbit mq, etc. So docker compose is not needed in that case.
CI/CD - GitLab
What is CI/CD?
- CI – Continuous Integration – automatically building and testing your code every time changes are pushed to the repository
- CD – Continuous Delivery / Continuous Deployment – automatically deploying your tested code to a server, so users always see the latest version
- Without CI/CD you would need to manually SSH into your server, pull the latest code, build it, restart services – every single time
- With CI/CD, you just
git pushand the pipeline takes care of the rest
How It All Fits Together
You (git push) -> GitLab reads .gitlab-ci.yml -> GitLab Runner on your VPS executes the pipeline
-> Docker builds your image -> Container starts on port 80
-> Proxy routes https://<uni-id>.proxy.itcollege.ee to your VPS
-> Your app is live
The university proxy handles TLS termination (HTTPS) – you don't need to configure SSL certificates in your nginx. The proxy also automatically routes traffic to your VPS based on your uni-id.
How GitLab Manages CI/CD
- GitLab has CI/CD built-in, everything is configured through a single file –
.gitlab-ci.ymlin your project root - When you push code, GitLab reads this file and creates a pipeline – a sequence of stages (e.g., build, test, deploy)
- Each stage contains jobs – actual commands that get executed
- Jobs are executed by a GitLab Runner – a small program installed on a server (your VPS in our case) that picks up jobs and runs them
- You can see pipeline status in your project under Build -> Pipelines – green means success, red means something failed
Setup GitLab CI/CD
Visit https://admin.proxy.itcollege.ee/ProxyHosts to get your assigned VPS IP address.
SSH into your VPS and set up GitLab Runner https://docs.gitlab.com/runner/install/linux-repository/.
Docker is already preinstalled on your VPS.
ssh root@<your_vps_ip>
and execute:
curl -L "https://packages.gitlab.com/install/repositories/runner/gitlab-runner/script.deb.sh" -o script.deb.sh
bash script.deb.sh
apt install gitlab-runner

# add gitlab-runner to docker group
sudo usermod -aG docker gitlab-runner
Now register your GitLab Runner with your GitLab account https://docs.gitlab.com/runner/register/.
Go to your project settings, CI/CD section, expand runners. Click Create project runner.
Add tag - shared for example. Add description if you want. Click 'Create runner'.
Follow instructions, copy the code you need to execute on your VPS.
Check in your VPS, that gitlab.proxy.itcollege.ee resolves to internal IP.
ping gitlab.proxy.itcollege.ee
PING gitlab.proxy.itcollege.ee (192.168.183.251) 56(84) bytes of data.
64 bytes from gitlab.proxy.itcollege.ee (192.168.183.251): icmp_seq=1 ttl=64 time=0.145 ms
If it does not, then add at the end of your /etc/hosts file:
192.168.183.251 gitlab.proxy.itcollege.ee
gitlab-runner register --url https://gitlab.proxy.itcollege.ee --token glrt-<YOUR_TOKEN>
When asked, choose shell executor.
Enter an executor: ssh, docker, docker-windows, docker+machine, docker-autoscaler, custom, shell, parallels, virtualbox, kubernetes, instance:
shell
Registration should be successful. Ask help from TAs or teachers if you have any issues.
Click view runners in GitLab and check that your runner is active.
Now you can create .gitlab-ci.yml file in your project root - this will tell GitLab what to do when you push to your repository.
https://docs.gitlab.com/ci/
Let's set up a simple nginx web server with static HTML.
.dockerignore
.git
README.md
.gitlab-ci.yml
docker-compose.yml
.dockerignore
node_modules
Dockerfile
FROM nginx:latest
COPY index.html /usr/share/nginx/html/index.html
docker-compose.yml
services:
  web:
    build: .
    container_name: nginx-demo
    ports:
      - "80:80"
index.html
<!DOCTYPE html>
<html lang="en">
<head>
    <meta charset="UTF-8">
    <meta name="viewport" content="width=device-width, initial-scale=1.0">
    <title>GitLab CI/CD Demo</title>
</head>
<body>
    <h1>Hello from GitLab CI/CD!</h1>
    <p>This page is served by nginx, deployed via Docker Compose.</p>
</body>
</html>
.gitlab-ci.yml
stages:
  - deploy

deploy:
  stage: deploy
  only:
    - main
  tags:
    - shared
  script:
    - docker compose -p test up --build --remove-orphans --detach
Push your code to GitLab.
Go to your project in GitLab, check Build -> Pipelines. Get it to green. Go to your VPS and check that your app is running.
docker ps
root@testserver:~# docker ps
CONTAINER ID   IMAGE      COMMAND                  CREATED              STATUS              PORTS                                 NAMES
e85067cf1ba3   test-web   "/docker-entrypoint.…"   About a minute ago   Up About a minute   0.0.0.0:80->80/tcp, [::]:80->80/tcp   nginx-demo
Check from proxy, that your default port is correct.
Default proxy route: https://<your uni-id>.proxy.itcollege.ee => http://<your internal ip>:<your internal port>
Open up the URL in your browser and check that your app is running.
Pipeline Debugging
When the pipeline goes red:
- Go to Build -> Pipelines in your GitLab project
- Click on the failed pipeline, then click on the failed job
- Read the job log from bottom up – the error is usually at the end
Common failures:
- npm install fails – check
package.jsonandpackage-lock.jsonare both committed - Docker build fails – check your
Dockerfilesyntax and that referenced files exist - Permission denied – make sure
gitlab-runneris in thedockergroup (sudo usermod -aG docker gitlab-runnerand restart the runner) - Container port conflict – another container is already using the same port. Stop old containers with
docker compose -p <project> down
Multi-stage CI/CD Pipeline
The example above only has a deploy stage. A more realistic pipeline separates concerns into build → test → deploy.
CI/CD from working example
.gitlab-ci.yml
stages:
  - deploy

deploy:
  stage: deploy
  only:
    - main
  tags:
    - shared
  script:
    - docker compose -p aspnetdocker up --build --remove-orphans --detach
docker-compose.yml
services:
  aspnet:
    build: .
    container_name: aspnet
    ports:
      - "8080:8080"
    environment:
      ASPNETCORE_ENVIRONMENT: "Production"
      ConnectionStrings__DefaultConnection: "Server=postgres;Port=5432;Database=dockerdemo;Username=postgres;Password=postgres"


  postgres:
    container_name: "postgres"
    pull_policy: always
    # https://github.com/baosystems/docker-postgis/pkgs/container/postgis
    image: ghcr.io/baosystems/postgis:18
    command: postgres -c 'max_connections=1000'
    restart: unless-stopped
    environment:
      - POSTGRES_USER=postgres
      - POSTGRES_PASSWORD=postgres
    volumes:
      - postgres-dev-data:/var/lib/postgresql


volumes:
  postgres-dev-data:
Dockerfile
FROM mcr.microsoft.com/dotnet/sdk:latest AS build
WORKDIR /app

# copy csproj and restore as distinct layers
COPY *.sln .
# copy ALL the projects
COPY App.DAL.EF/*.csproj ./App.DAL.EF/
COPY App.Domain/*.csproj ./App.Domain/
COPY WebApp/*.csproj ./WebApp/
RUN dotnet restore

# copy everything else and build app
# copy all the projects
COPY App.DAL.EF/. ./App.DAL.EF/
COPY App.Domain/. ./App.Domain/
COPY WebApp/. ./WebApp/
WORKDIR /app/WebApp
RUN dotnet publish -c Release -o out


FROM mcr.microsoft.com/dotnet/aspnet:latest AS runtime
WORKDIR /app
COPY --from=build /app/WebApp/out ./
ENTRYPOINT ["dotnet", "WebApp.dll"]
.dockerignore
**/bin
**/obj
**/out
**/.vscode
**/.vs
.dotnet
.Microsoft.DotNet.ImageBuilder
Self preparation QA
Be prepared to explain topics like these:
- Why use Docker for deployment instead of bare metal or VMs? — Docker provides consistent, reproducible environments. The same image runs identically everywhere. It isolates the application from the host system.
- Why use a multi-stage Dockerfile (sdk + aspnet images)? — The
sdkimage is large (build tools). Theaspnetimage is small (runtime only). Multi-stage builds produce lean production images, reducing attack surface and image size. - Why copy and restore
.csprojfiles separately before copying source code? — Docker caches each layer. If only source code changes, thedotnet restorelayer is reused from cache, making rebuilds faster. - How should connection strings be managed in Docker deployments? — Never hardcode connection strings. Use environment variables set externally. In production, use secrets managers or orchestrator-provided secrets.
- What does
.dockerignoredo and why is it important? — It excludes files from the Docker build context. Without it, unnecessary files increase build context size and slow down builds. - What is
host.docker.internalin connection strings? — It resolves to the host's IP from within the container, allowing containerized apps to connect to services on the host machine. In production, use actual service hostnames.