98 - iOS Core Data
Core Data & Swift UI
Guard
1 2 3 4 5 | |
The unwrapping is a little unintuitive with guard - if let unwraps values for use inside a block. Here the guard statement has an associated block but it’s actually an else block - i.e., the thing you do if the unwrapping fails - the values are unwrapped straight into the same context as the statement itself.
Same as TypeScript/C# compiler analysis
1 2 | |
Extension
1 2 3 4 5 6 7 | |
- Add computed instance properties and computed type properties
- Define instance methods and type methods
- Provide new initializers
- Define subscripts
- Define and use new nested types
- Make an existing type conform to a protocol
- Extensions can add new functionality to a type, but they cannot override existing functionality.
1 2 3 4 5 6 7 | |
Although properties are implemented as computed properties, the names of these properties can be appended to a floating-point literal value with dot syntax, as a way to use that literal value to perform distance conversions.
1 2 3 4 5 6 7 8 9 | |
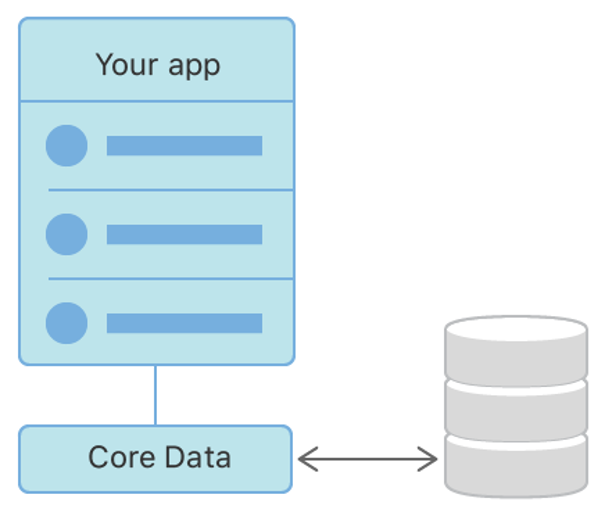
Core Data
- Core Data is used to manage the model layer object in our application.
- Core Data is a framework to save, track, modify and filter the data within iOS apps
- Core Data is not a Database!.
- Core Data is using SQLite as it’s persistent store but the framework itself is not the database.
- Core Data does much more than databases - managing the object graphs, tracking the changes in the data and more
Persistence
Core Data abstracts the details of mapping your objects to a store, making it easy to save data from Swift and Objective-C without administering a database directly.
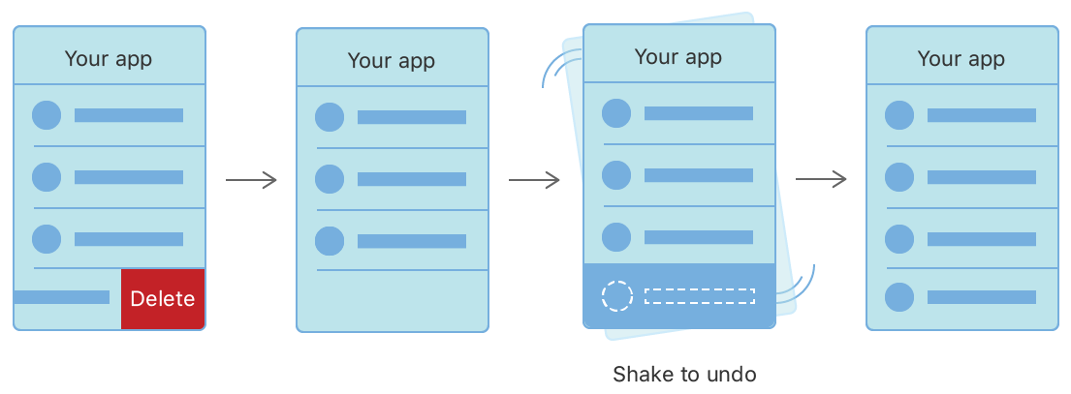
Undo & Redo
Undo and Redo of Individual or Batched Changes
Core Data’s undo manager tracks changes and can roll them back individually, in groups, or all at once, making it easy to add undo and redo support to your app.
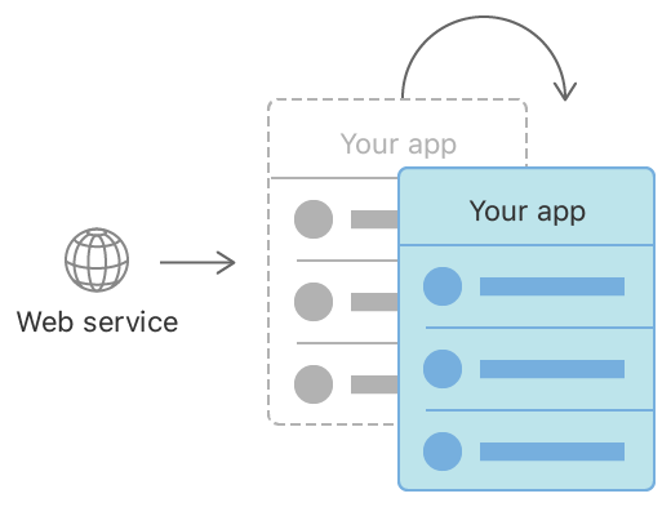
Background Data Tasks
Perform potentially UI-blocking data tasks, like parsing JSON into objects, in the background. You can then cache or store the results to reduce server roundtrips.
Sync and Migration
View Synchronization
Core Data also helps keep your views and data synchronized by providing data sources for table and collection views.
Versioning and Migration
Core Data includes mechanisms for versioning your data model and migrating user data as your app evolves.
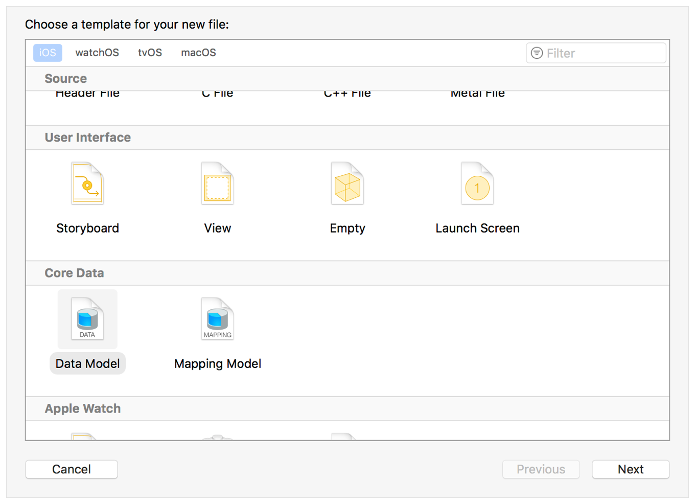
Core Data Model
Create a core data model
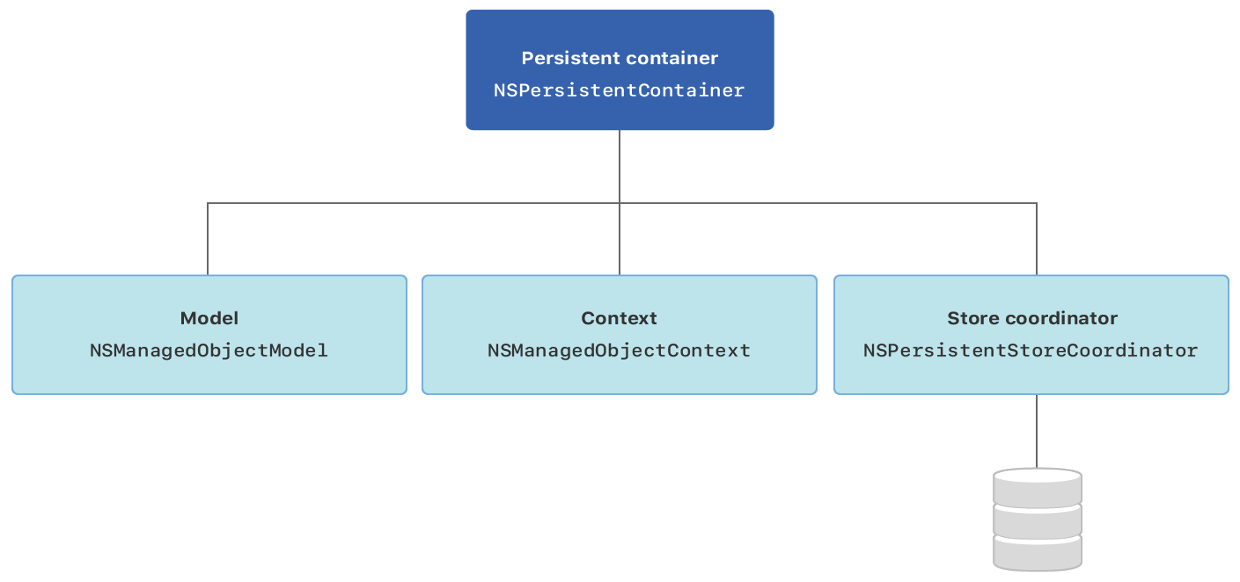
Core Data Stack
- Classes that manage and persist your app’s objects.
- NSManagedObjectModel represents your app’s model file describing your app’s types, properties, and relationships.
- NSManagedObjectContext tracks changes to instances of your app’s types.
- NSPersistentStoreCoordinator saves and fetches instances of your app’s types from stores.
- NSPersistentContainer sets up the model, context, and store coordinator all at once.
Core Data Modelling
- Entities
- Model your app’s objects.
- Attributes
- Describe the properties that compose an entity.
- Relationships
- Specify how entities relate and how change propagates between them.
- Generating Code
- Automatically or manually generate managed object subclasses from entities.

Entity 1
-
An entity describes an object, including its name, attributes, and relationships. Create an entity for each of your app’s objects.
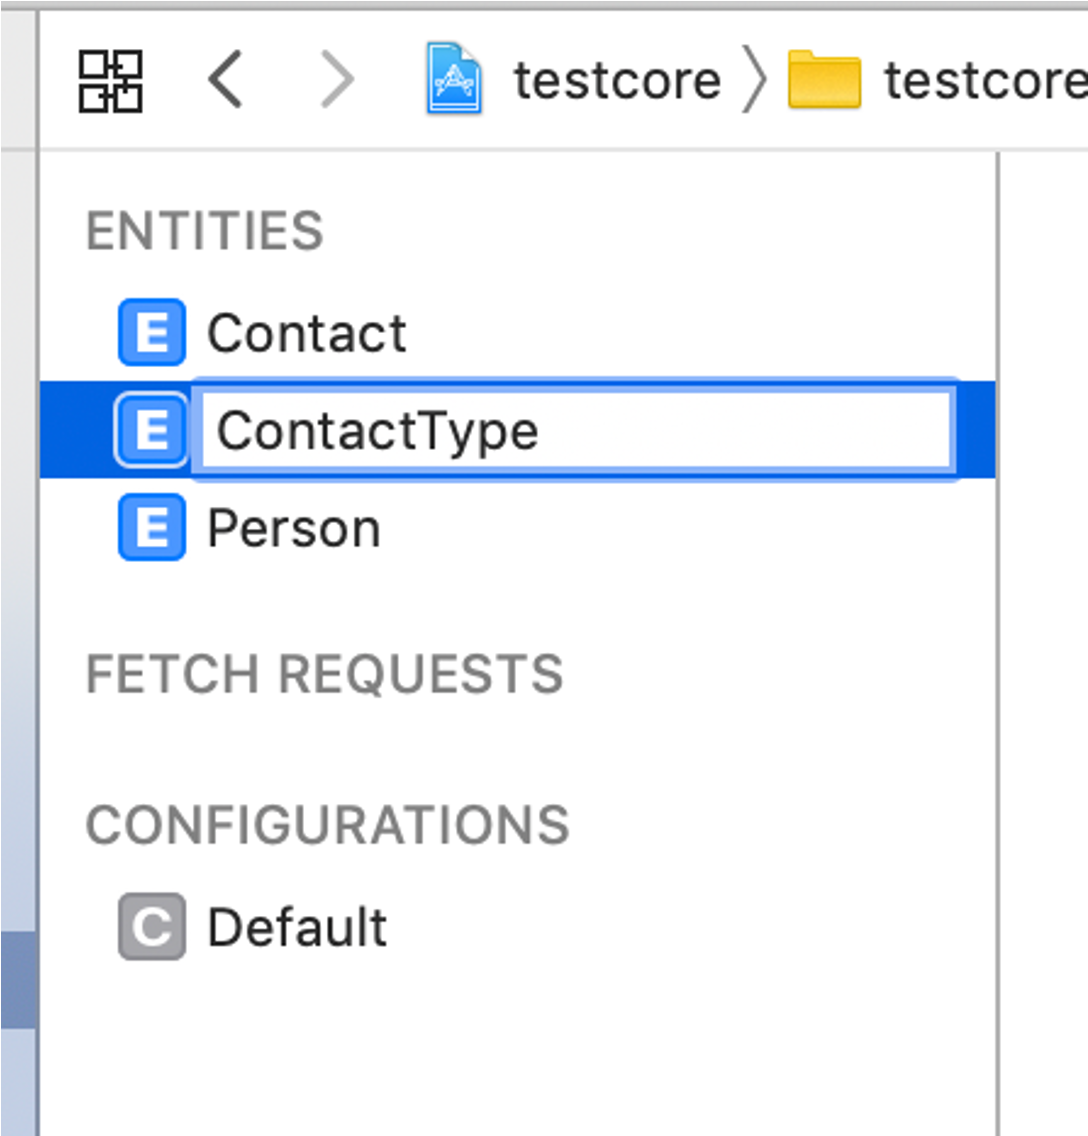
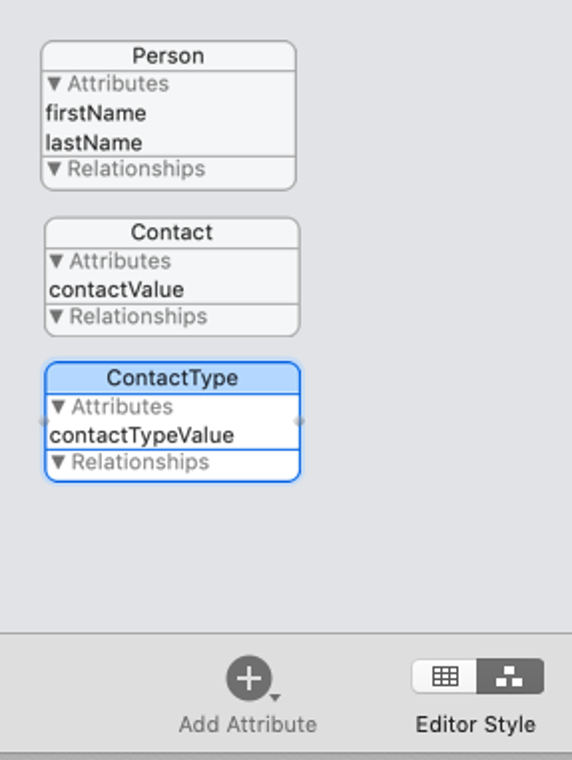
- Person, Contact, ContactType
-
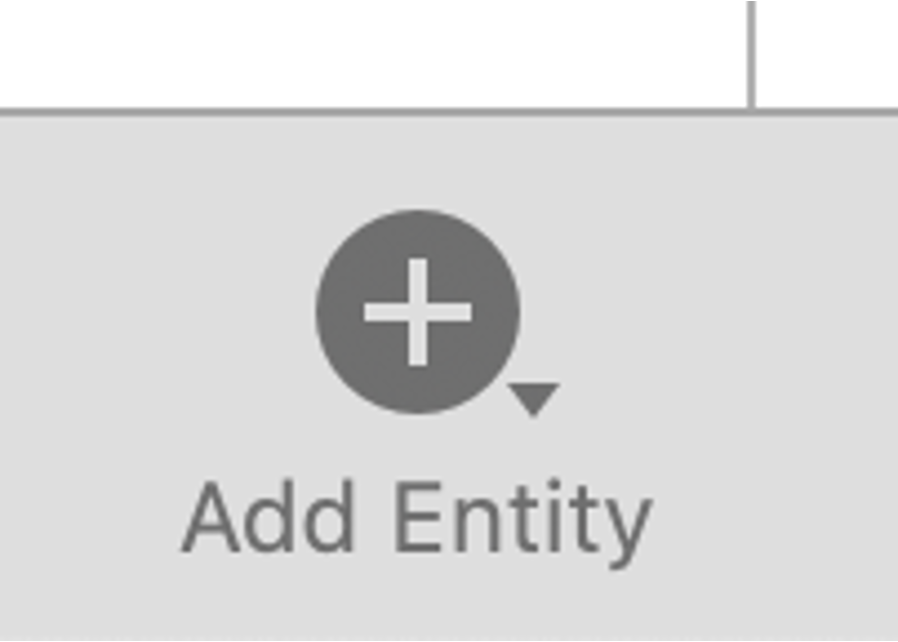
Click Add Entity at the bottom of the editor area. A new entity with placeholder name Entity appears in the Entities list.
- In the Entities list, double-click the newly added entity, and name it in place. This updates both the entity name and class name visible in the Data Model inspector.
Entity 2
- Entity Properties – advanced usage, defaults are mostly ok
- Entity Name
The name of the entity in the managed object model. This field reflects the name shown in the Entities list. - Class Name
The name of the class you'll use when creating managed object instances from this entity. By default, the class name mirrors the entity name; however, if you change the class name, the changes are not reflected in the entity name. - Parent Entity
If you have a number of similar entities, you can define the common properties in a parent entity, and have child entities inherit those properties. By default, this field is blank. - Constraints
After adding attributes, optionally enter the name of an attribute (or comma-separated list of attributes) to serve as unique constraints on the entity. Unique constraints prevent duplicate records in the store.
Entity 3
- Abstract Entity
Select the Abstract Entity checkbox if you won’t create any instances of the entity—for example, if it exists only as a parent entity that should never be instantiated directly. By default, this option is unselected, resulting in a concrete entity. - Module
The module where the class for this entity resides. By default, Core Data locates class files in the global namespace. - Codegen
Select a code generation option for generating managed object subclass and properties files to support your entity. By default, this is set to Class Definition, and Core Data generates both files for you automatically. - Spotlight Display Name
An NSExpression used by Core Spotlight to display an instance created from this entity. - User Info
A dictionary in which you can optionally store any application-specific information related to the entity. - Versioning Hash Modifier
Provide a hash modifier when maintaining multiple model versions if the structure of an entity is the same, but the format or content of its data has changed. - Versioning Renaming ID
Provide a renaming ID if you rename an entity between model versions. Set the renaming identifier in the new model to the name of the corresponding entity in the previous model.
Entity 4
- Configuring Attributes - Describe the properties that compose an entity.
- An attribute describes a property of an entity. At minimum, you need to specify the property’s name and data type, whether it should be saved in the store, and whether it is required to have a value when it’s saved.
- For some attribute types you can also choose whether to use a scalar type to represent the attribute in generated classes, as well as configure the attribute to have a default value, or to apply data validation rules.
Entity 5
- With an entity selected, click Add Attribute at the bottom of the editor area. A new attribute with placeholder name attribute, of type Undefined, appears in the Attributes list.
- In the Attributes list, double-click the newly added attribute, and name it in place.
- In the Attributes list, click on Undefined and select the attribute’s data type from the Type dropdown list.

Entity Attributes
- Transient
Transient attributes aren’t saved to the persistent store. By default, attributes are saved to the store. Transient attributes are a useful place to temporarily store calculated or derived values. Core Data does track changes to transient property values for undo purposes. - Optional
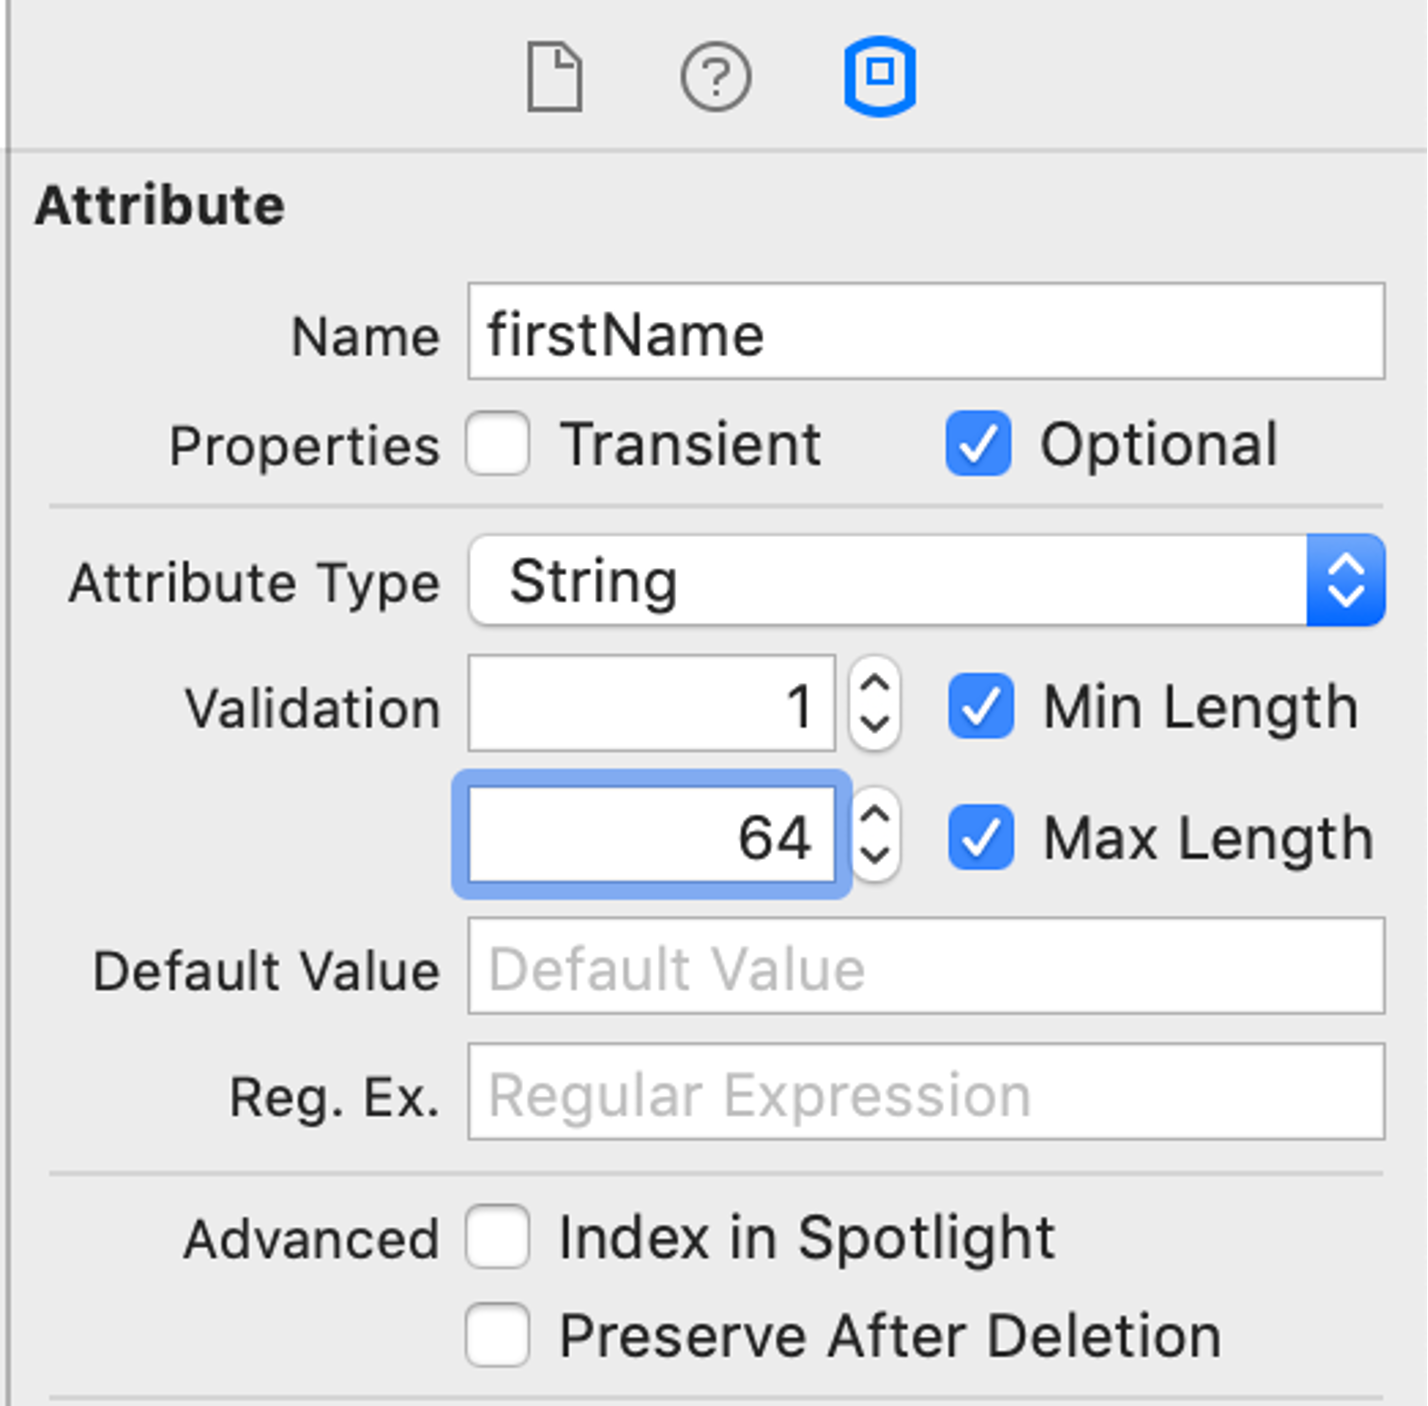
Optional attributes aren’t required to have a value when saved to the persistent store. Attributes are optional by default. Core Data optionals aren’t the same as Swift optionals. You can use a Swift optional to represent a required attribute, for example, if you need flexibility to set its value during the time between the object’s initialization and its first save. - Attribute Type
The attribute’s data type. This field reflects the selection made in the Attributes list’s Type dropdown. - Default Value
Most types allow you to supply a default value. New object instances set the attribute to this default value on initialization, unless you specify another value at that time. Supplying a default value, in combination with making the type non-optional, can provide performance benefits. - Validation
Optionally, set validation rules such as the minimum and maximum values for a numeric type, or regular expressions requirements for strings. The data model inspector shows validation options specific to the selected attribute’s type. - Use Scalar Type
Optionally, for some types, choose between scalar and non-scalar representations during code generation. For a Double, selecting the Use Scalar checkbox produces a Double, while leaving it unselected produces an NSNumber.
Relationship
- A relationship describes how an entity affects another entity.
- At minimum, a relationship specifies
- a name,
- a destination entity,
- a delete rule,
- a cardinality type (To One or To Many),
- settings for whether the relationship should be saved in the store (transient),
- and whether it is required to have a value when saved (optional).
- You should also configure every relationship with an inverse relationship
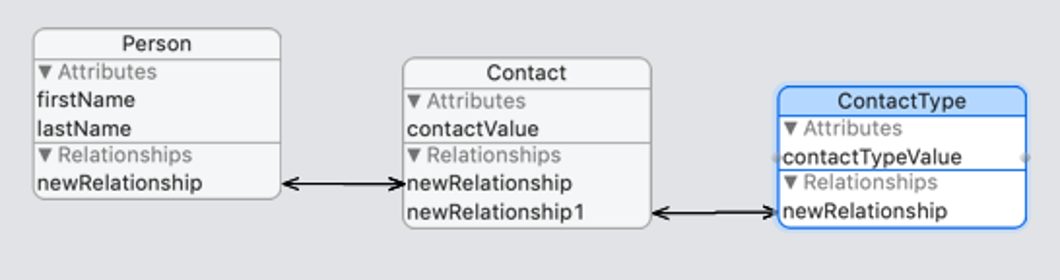
- Select the graph editor style to view all of your app’s entities at once.
- Control-drag from one entity relationships are to another entity to create a pair of relationships. An arrow appears between the entities to indicate a relationship, and a relationship with placeholder name newRelationship is added to each entity.
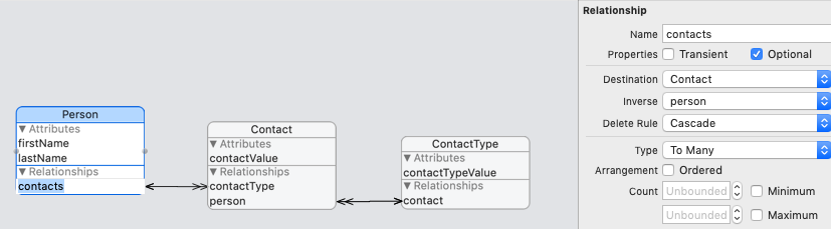
Relationship 1:1 1:m
Configure created relationships (double click on relationship name)
1:Many
1:1
Relationship properties 1
- Transient
Transient relationships aren’t saved to the persistent store. This makes transient relationships a useful place to temporarily store calculated or derived values. Core Data does track changes to transient property values for undo purposes. - Optional
Optional relationships aren’t required to have any instances of their destination type. A required relationship must point to one or more instances of the destination type. - Destination
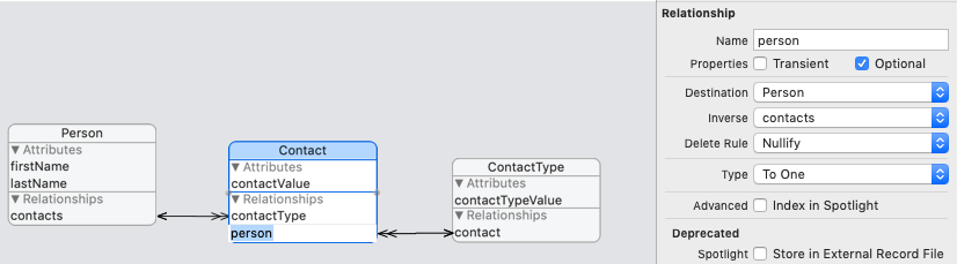
Each relationship points from a source entity (the entity whose relationships you’re editing) to a destination entity. The destination entity is a related type that affects and is affected by the source type. Setting the same source and destination types creates a reflexive relationship. For example, an Employee may manage another Employee. - Inverse
Inverse relationships enable Core Data to propagate change in both directions when an instance of either the source or destination type changes. Every relationship should have an inverse. When creating relationships in the Graph editor, you add inverse relationships between entities in a single step. When creating relationships in the Table editor, you add inverse relationships to each entity in turn.
Relationship properties 2
- Delete Rule
A relationship’s delete rule specifies how change propagates across relationships when a source instance is deleted. No Action to delete the source object instance, but leave references to it in any destination object instances, which you update manually. Nullify to delete the source object instance, and nullify references to it in any destination object instances. Cascade to delete the source object instance, and with it, all of the destination object instances. Deny to delete the source object only if it doesn’t point to any destination object instances. - Cardinality Type
Specify a relationship as being To One or To Many, which is known as its cardinality. Use To One relationships to connect the source with a single instance of the destination type. Use To Many relationships to connect the source with a mutable set of the destination type, and to optionally specify an arrangement and count: Arrangement: Select the Ordered checkbox to specify that the relationship has an inherent ordering, and to generate an ordered mutable set. Count: You can also place upper and lower limits on the number of destination instances. For optional relationships, the number of instances can be zero or within these bounds.
Code generation
- Select an entity from the Entities list.
- In the Data Model inspector, under Class, the Codegen list offers three options:
- Class Definition – you won’t need to edit generated logic or properties
- Category/Extension – to add logic to the managed object subclass
- Manual/None – to edit properties and logic in the managed object subclass
- Class definition
The generated source code doesn’t appear in your project’s source list. Xcode produces the class and properties files as part of the build process and places them in your project’s build directory. These files regenerate whenever the related entity changes in the data model. - Category/Extension
Take full control of the class file, while continuing to automatically generate the properties file to keep it up-to-date with the model editor. Create and maintain your class manually. (custom getters/setters etc) - To generate the class file initially
- Choose Editor > Create NSManagedObject Subclass from the menu at the top of the screen.
- Select your data model, then the appropriate entity, and choose where to save the files. Xcode places both class and properties files into your project.
- Because the properties file continues to be produced as part of the build process, move this duplicate file from your project source list to the trash.
- You can now see and edit the class file in your project source list.
Core Data & Swift UI
- Model your data
- Load and manage Core data configuration - singleton pattern
- instance is stored into Environment
1 2 3 4 5 6 7 8 9 10 11 12 13 14 15 16 17 18 19 20 21 22 23 24 25 26 27 28 29 30 31 32 33 34 35 | |
Preview of data during development
- To get some static data injected for content previews enable inmemory option and static preview
- Insert preview data
1 2 3 4 5 6 7 8 9 10 11 12 13 14 15 16 17 18 19 20 21 22 23 | |
Persistence and Environment
1 2 3 4 5 6 7 8 9 10 11 12 13 | |
Using Core Data in views
- Get reference to context from environment
@Environment(\.managedObjectContext) - Describe how to fetch data (sorting and filtering)
@FetchRequest - Create variable to store fetched data
FetchedResults<EntityType> - Add in-memory context to preview
.environment(\.managedObjectContext, PersistenceController.preview.container.viewContext)
1 2 3 4 5 6 7 8 9 10 11 12 13 14 15 16 17 18 19 20 21 22 23 24 25 26 27 28 | |