JS Deploy
Intro
- After your JavaScript app is developed, it needs to be hosted by a publicly accessible web server
- Simplest solution – get some free hosting (even
enos.itcollege.ee/~homefoldershould be good enough for that) - Don't forget to set up your server's root/home path – otherwise script inclusion paths are wrong. Routing also gets confused.
- If you want to use full HTML5 history mode for URL, the server needs some configuration (
/invoice/client/5vs/#/invoice/client/5)
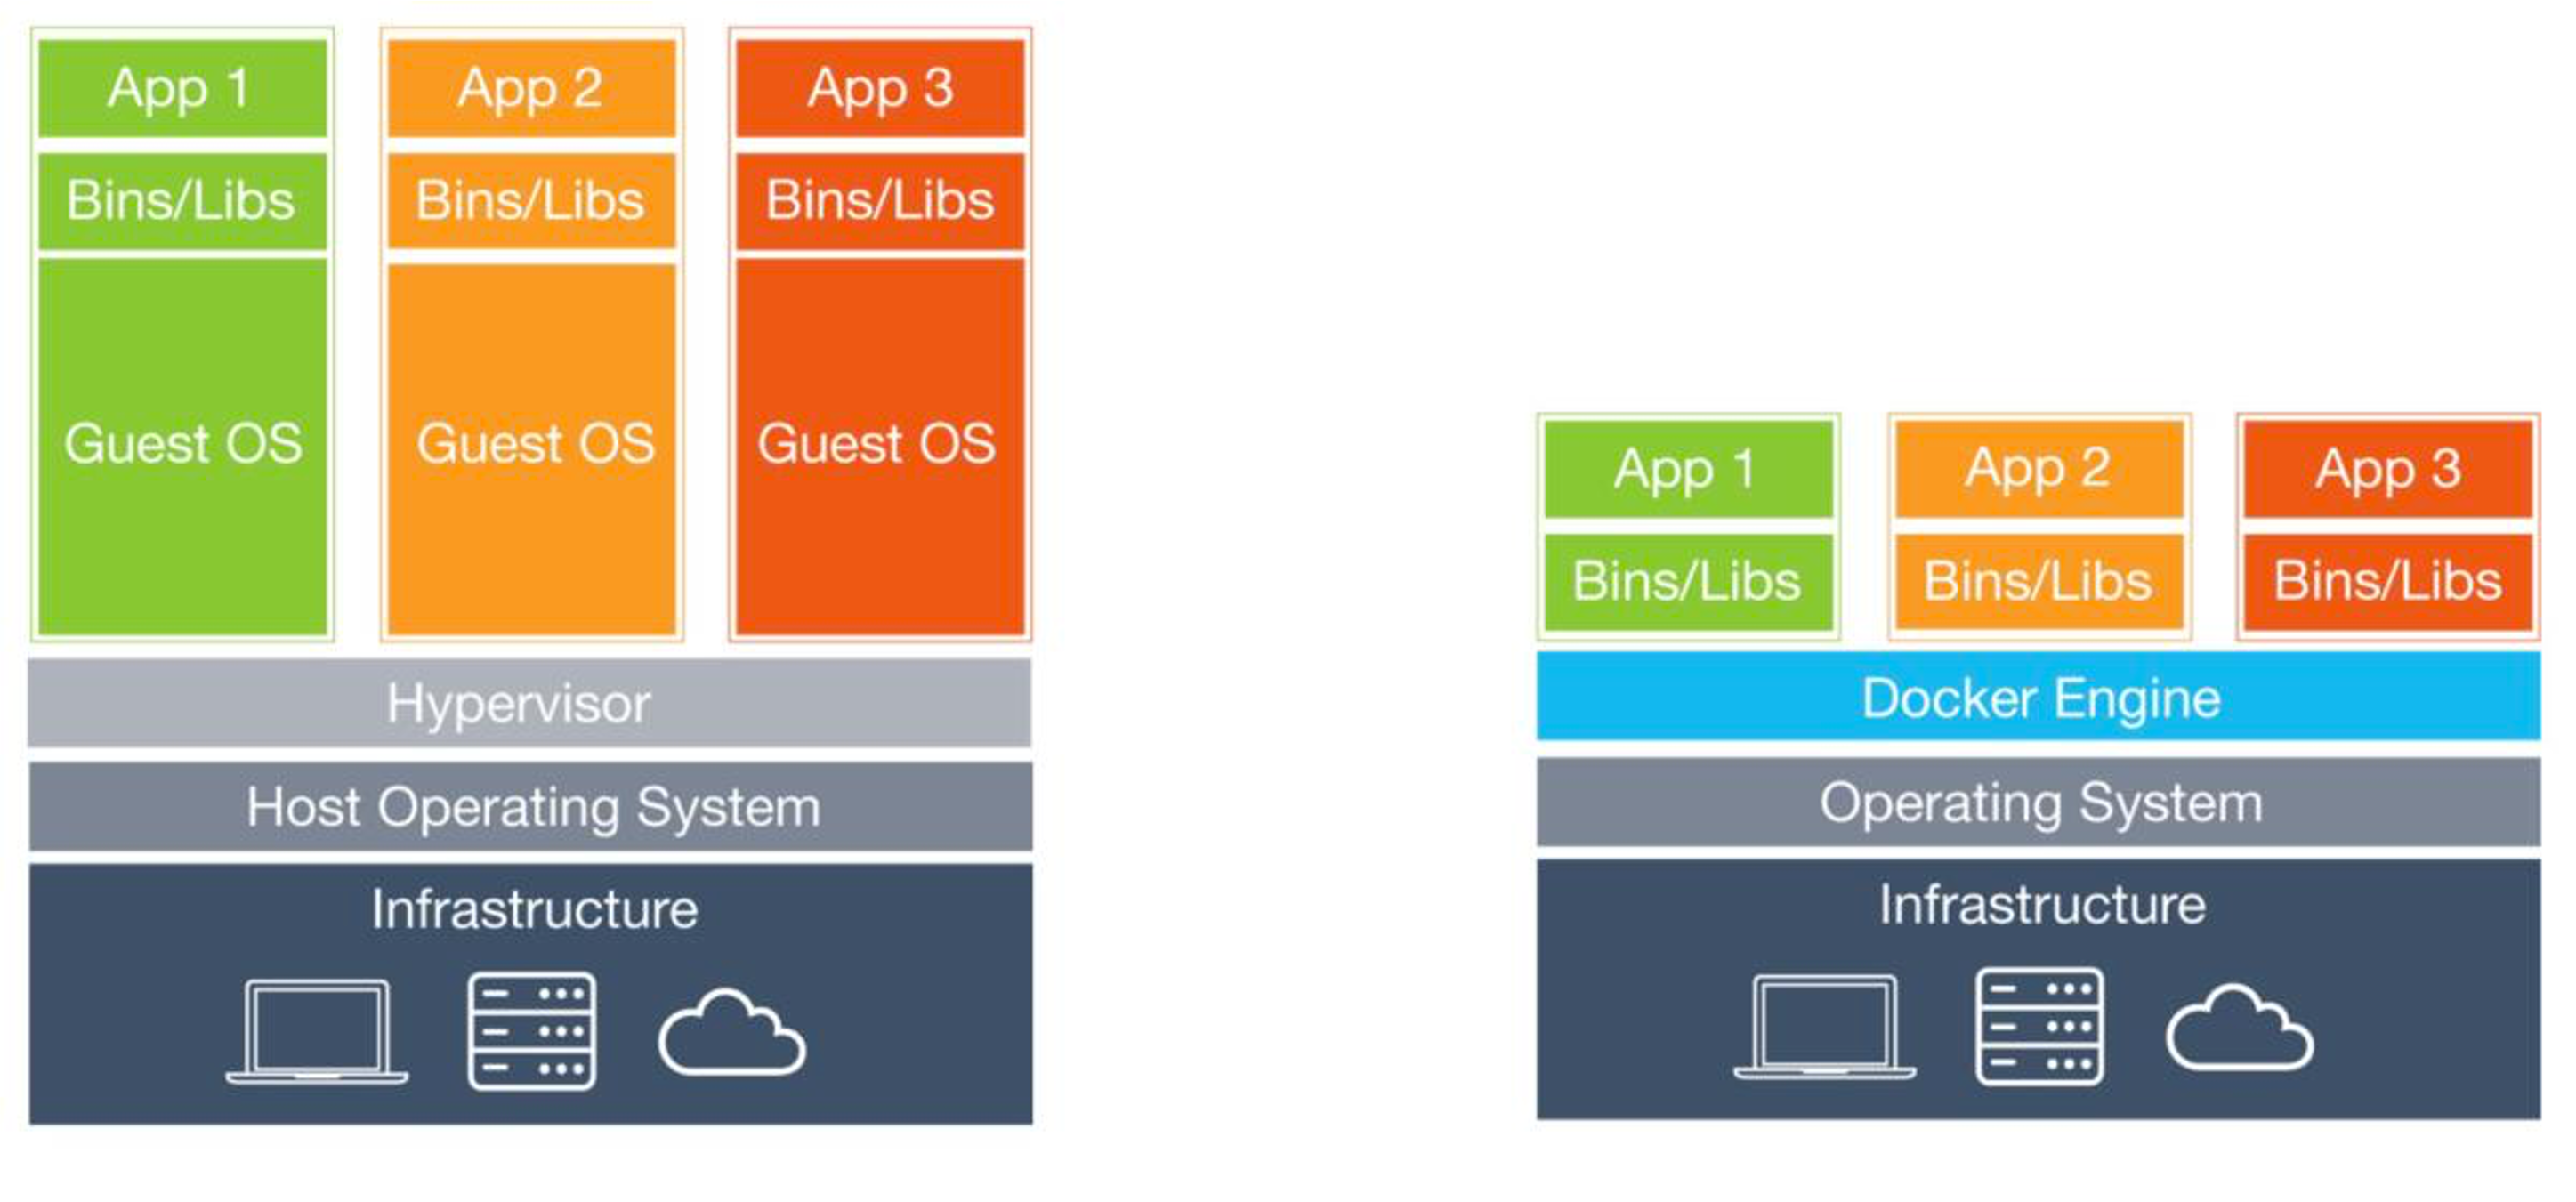
What is Docker?
- Docker is a tool that packages your application together with everything it needs to run – OS libraries, runtime, dependencies, configuration – into a container. This solves the classic "works on my machine" problem – since everything is packaged inside the container, it runs the same way on your laptop, your teammate's laptop, and the production server.
- A container is not a virtual machine – it does not run a separate operating system with its own kernel. Containers share the host's kernel and only isolate the application layer, which makes them much lighter and faster to start. Think of it this way: a VM is like renting an entire apartment (own kitchen, bathroom, everything), while a container is like renting a desk in a coworking space – you get your own isolated workspace but share the building's infrastructure.
- In this course we use Docker to package our built JavaScript apps with an nginx web server into a single container that can be deployed anywhere.
- Containers are ephemeral – when a container is removed, any data inside it is lost. If you need persistent data (databases, uploads), you must use Docker volumes to store data outside the container.
-
Commonly nginx image is used as base for JS apps
-
Two possible nginx base images to use
- nginx:latest
- nginx:alpine
-
Alpine – special ultra-lightweight Linux-based image. Has some compatibility problems (uses different libc) in some rare cases.
-
Alpine Linux image is ~5x smaller
Building a Docker Image
-
Minimal Dockerfile
-
Base image nginx:latest
- Copy all files and folders from ./dist/ to image's html content folder (build your JS app in production mode first)
-
Build the container
> docker build -t js-nginx:latest . -
Start the container (map local port 8080 to container's port 80)
> docker run -d -p 8080:80 js-nginx:latest -
List running containers
> docker ps -
Stop container (with id taken from docker ps)
> docker container stop 425d351d2f35
Dockerfile
FROM nginx:latest
COPY ./dist /usr/share/nginx/html
Multi-stage Docker Builds
In production, you should use multi-stage builds. Instead of building your JS app locally and copying the dist folder, the Docker image itself handles the build. This ensures reproducible builds and avoids shipping node_modules or source code in the final image.
# Stage 1: Build the application
FROM node:20-alpine AS build
WORKDIR /app
COPY package*.json ./
RUN npm ci
COPY . .
RUN npm run build
# Stage 2: Serve with nginx
FROM nginx:alpine
COPY /app/dist /usr/share/nginx/html
- Stage 1 uses a Node.js image to install dependencies and run the build
- Stage 2 starts fresh from a tiny nginx image and only copies the built output
- The final image contains only nginx + your static files – no Node.js, no node_modules, no source code
- This is the standard pattern for deploying any frontend application
HTML5 History Mode in Docker
- JS routers typically have two modes – using full URLs or hash-based URLs
- Problem with full URLs – when a new session is started with a full URL, the server will respond with 404 – page not found. Because we actually only have one single page
/index.html - Servers need some configuration to rewrite URLs to host the same page regardless of specified URL (when exact match is not found).
- Nginx configuration (partial)
http {
    server {
        location / {
            try_files $uri $uri/ /index.html;
        }
    }
}
Multiple Apps in One Container
- Typically for testing we need to deploy several JS apps side-by-side
- This allows us to use only one container
- Configure base paths in JS apps correctly
- Copy every JS app into separate directory inside docker image
- Copy nginx.conf also into container
FROM nginx:latest
COPY ./vue-app/dist /usr/share/nginx/html/vue-app
COPY ./next-app/dist /usr/share/nginx/html/next-app
COPY nginx.conf /etc/nginx/nginx.conf
Vue in subdir
- Add
.env.production
BASE_URL=/vue-app
BASE_URL (without VITE_ prefix) works here because it is read by vite.config.ts at build time (server-side Node.js context). Only variables that need to be accessible in your Vue component code at runtime require the VITE_ prefix.
- Modify vite.config.ts, configure
base
import { fileURLToPath, URL } from "node:url";
import { defineConfig, loadEnv } from "vite";
import vue from "@vitejs/plugin-vue";

export default defineConfig(({ mode }) => {
  const env = loadEnv(mode, process.cwd(), "");
  return {
    plugins: [vue()],
    base: env.BASE_URL,
    resolve: {
      alias: {
        "@": fileURLToPath(new URL("./src", import.meta.url)),
      },
    },
  };
});
nginx.conf
worker_processes 1;
events {
    worker_connections 1024;
}
http {
    server {
        listen 80;
        server_name localhost;

        root /usr/share/nginx/html;
        index index.html index.htm;
        include /etc/nginx/mime.types;

        gzip on;
        gzip_min_length 1000;
        gzip_proxied expired no-cache no-store private auth;
        gzip_types text/plain text/css application/json application/javascript application/x-javascript text/xml application/xml application/xml+rss text/javascript;

        location /next-app/ {
            # next.js static export: resolve /foo => /foo.html
            try_files $uri $uri.html /next-app/index.html =404;
        }

        location /vue-app/ {
            try_files $uri $uri/ /vue-app/index.html;
        }
    }
}
Environment Variables – Build Time vs Runtime
Frontend JavaScript apps are static files after build. Environment variables are baked into the code at build time – they are not read from the server at runtime. This is a common source of confusion.
Each framework has its own prefix convention for which env vars get embedded into client-side code:
| Framework | Client-side prefix | Config file (server-side) |
|---|---|---|
| Vite (Vue) | VITE_ | vite.config.ts reads all env vars |
| Next.js | NEXT_PUBLIC_ | next.config.mjs reads all env vars |
Variables without the prefix are only available in config files (Node.js context at build time), not in your component code.
Next.js SPA – Static Export (no server-side)
-
Add
.env.productionfornpm run build
BASE_URL=/next-app
- Add
.env.developmentfor localnpm run dev
BASE_URL=
or check in code – when you use process.env.BASE_URL handle undefined correctly.
const BASE_URL = process.env.BASE_URL || "";
BASE_URL works without the NEXT_PUBLIC_ prefix in next.config.mjs because the config file runs in Node.js context at build time. However, if you need to access the base URL inside your React components, use NEXT_PUBLIC_BASE_URL instead.
Modify next.config.mjs
/** @type {import('next').NextConfig} */

const base_path = process.env.BASE_URL;

const nextConfig = {
  output: "export",
  distDir: "dist",
  basePath: base_path,
};

export default nextConfig;
When using the next/image component, you will need to add the basePath in front of src.
<Image
  src={process.env.BASE_URL + "/next.svg"}
  alt="Vercel Logo"
/>
Next.js in Docker – Needs Node.js (standalone, includes SSR)
Container Landing Page
Add a default /index.html with links into different JS app areas.
CI/CD - GitLab
What is CI/CD?
- CI – Continuous Integration – automatically building and testing your code every time changes are pushed to the repository
- CD – Continuous Delivery / Continuous Deployment – automatically deploying your tested code to a server, so users always see the latest version
- Without CI/CD you would need to manually SSH into your server, pull the latest code, build it, restart services – every single time
- With CI/CD, you just
git pushand the pipeline takes care of the rest
How It All Fits Together
You (git push) -> GitLab reads .gitlab-ci.yml -> GitLab Runner on your VPS executes the pipeline
-> Docker builds your image -> Container starts on port 80
-> Proxy routes https://<uni-id>.proxy.itcollege.ee to your VPS
-> Your app is live
The university proxy handles TLS termination (HTTPS) – you don't need to configure SSL certificates in your nginx. The proxy also automatically routes traffic to your VPS based on your uni-id.
How GitLab Manages CI/CD
- GitLab has CI/CD built-in, everything is configured through a single file –
.gitlab-ci.ymlin your project root - When you push code, GitLab reads this file and creates a pipeline – a sequence of stages (e.g., build, test, deploy)
- Each stage contains jobs – actual commands that get executed
- Jobs are executed by a GitLab Runner – a small program installed on a server (your VPS in our case) that picks up jobs and runs them
- You can see pipeline status in your project under Build -> Pipelines – green means success, red means something failed
Setup GitLab CI/CD
Visit https://admin.proxy.itcollege.ee/ProxyHosts to get your assigned VPS IP address.
SSH into your VPS and set up GitLab Runner https://docs.gitlab.com/runner/install/linux-repository/.
Docker is already preinstalled on your VPS.
ssh root@<your_vps_ip>
and execute:
curl -L "https://packages.gitlab.com/install/repositories/runner/gitlab-runner/script.deb.sh" -o script.deb.sh
bash script.deb.sh
apt install gitlab-runner

# add gitlab-runner to docker group
sudo usermod -aG docker gitlab-runner
Now register your GitLab Runner with your GitLab account https://docs.gitlab.com/runner/register/.
Go to your project settings, CI/CD section, expand runners. Click Create project runner.
Add tag - shared for example. Add description if you want. Click 'Create runner'.
Follow instructions, copy the code you need to execute on your VPS.
Check in your VPS, that gitlab.proxy.itcollege.ee resolves to internal IP.
ping gitlab.proxy.itcollege.ee
PING gitlab.proxy.itcollege.ee (192.168.183.251) 56(84) bytes of data.
64 bytes from gitlab.proxy.itcollege.ee (192.168.183.251): icmp_seq=1 ttl=64 time=0.145 ms
If it does not, then add at the end of your /etc/hosts file:
192.168.183.251 gitlab.proxy.itcollege.ee
gitlab-runner register --url https://gitlab.proxy.itcollege.ee --token glrt-<YOUR_TOKEN>
When asked, choose shell executor.
Enter an executor: ssh, docker, docker-windows, docker+machine, docker-autoscaler, custom, shell, parallels, virtualbox, kubernetes, instance:
shell
Registration should be successful. Ask help from TAs or teachers if you have any issues.
Click view runners in GitLab and check that your runner is active.
Now you can create .gitlab-ci.yml file in your project root - this will tell GitLab what to do when you push to your repository.
https://docs.gitlab.com/ci/
Let's set up a simple nginx web server with static HTML.
.dockerignore
.git
README.md
.gitlab-ci.yml
docker-compose.yml
.dockerignore
node_modules
Dockerfile
FROM nginx:latest
COPY index.html /usr/share/nginx/html/index.html
docker-compose.yml
services:
  web:
    build: .
    container_name: nginx-demo
    ports:
      - "80:80"
index.html
<!DOCTYPE html>
<html lang="en">
<head>
    <meta charset="UTF-8">
    <meta name="viewport" content="width=device-width, initial-scale=1.0">
    <title>GitLab CI/CD Demo</title>
</head>
<body>
    <h1>Hello from GitLab CI/CD!</h1>
    <p>This page is served by nginx, deployed via Docker Compose.</p>
</body>
</html>
.gitlab-ci.yml
stages:
  - deploy

deploy:
  stage: deploy
  only:
    - main
  tags:
    - shared
  script:
    - docker compose -p test up --build --remove-orphans --detach
Push your code to GitLab.
Go to your project in GitLab, check Build -> Pipelines. Get it to green. Go to your VPS and check that your app is running.
docker ps
root@testserver:~# docker ps
CONTAINER ID   IMAGE      COMMAND                  CREATED              STATUS              PORTS                                 NAMES
e85067cf1ba3   test-web   "/docker-entrypoint.…"   About a minute ago   Up About a minute   0.0.0.0:80->80/tcp, [::]:80->80/tcp   nginx-demo
Check from proxy, that your default port is correct.
Default proxy route: https://<your uni-id>.proxy.itcollege.ee => http://<your internal ip>:<your internal port>
Open up the URL in your browser and check that your app is running.
Pipeline Debugging
When the pipeline goes red:
- Go to Build -> Pipelines in your GitLab project
- Click on the failed pipeline, then click on the failed job
- Read the job log from bottom up – the error is usually at the end
Common failures:
- npm install fails – check
package.jsonandpackage-lock.jsonare both committed - Docker build fails – check your
Dockerfilesyntax and that referenced files exist - Permission denied – make sure
gitlab-runneris in thedockergroup (sudo usermod -aG docker gitlab-runnerand restart the runner) - Container port conflict – another container is already using the same port. Stop old containers with
docker compose -p <project> down
Multi-stage CI/CD Pipeline
The example above only has a deploy stage. A more realistic pipeline separates concerns into build → test → deploy:
stages:
  - build
  - test
  - deploy

build:
  stage: build
  only:
    - main
  tags:
    - shared
  script:
    - cd frontend
    - npm ci
    - npm run build
  artifacts:
    paths:
      - frontend/dist/
      - frontend/node_modules/
    expire_in: 1 hour

test:
  stage: test
  only:
    - main
  tags:
    - shared
  needs:
    - build
  script:
    - cd frontend
    - npx vitest run
  artifacts:
    when: always
    paths:
      - frontend/coverage/
    expire_in: 1 week

deploy:
  stage: deploy
  only:
    - main
  tags:
    - shared
  needs:
    - test
  script:
    - docker compose -p myapp up --build --remove-orphans --detach
- The
buildstage installs dependencies, runs the build, and saves bothdist/andnode_modules/as artifacts so later stages don't need to reinstall - The
teststage runsnpx vitest run(single-run mode, no watch) — if any test fails, the pipeline stops and deploy never happens - The
deploystage only runs if bothbuildandtestsucceed artifacts: when: alwayson the test job ensures coverage reports are saved even when tests fail, so you can debug
Tests run against source code in Node.js, not against the Docker image. The Docker image only contains the built static files served by nginx — there is nothing to "test" inside it. The pipeline ensures that only code that passes tests gets built into the final image and deployed.
To also generate a coverage report in CI, change the test script to:
  script:
    - cd frontend
    - npx vitest run --coverage
Make sure @vitest/coverage-v8 is in your devDependencies.
Running Tests Inside Docker Multi-stage Build
An alternative approach is to run tests as part of the Docker build itself. If tests fail, the image build fails and nothing gets deployed:
# Stage 1: Install dependencies
FROM node:20-alpine AS deps
WORKDIR /app
COPY package*.json ./
RUN npm ci
# Stage 2: Run tests
FROM deps AS test
COPY . .
RUN npx vitest run
# Stage 3: Build the application
FROM test AS build
RUN npm run build
# Stage 4: Serve with nginx
FROM nginx:alpine
COPY /app/dist /usr/share/nginx/html
- If
npx vitest runexits with a non-zero code (test failure), Docker stops the build at stage 2 - No separate CI test stage needed — the Dockerfile is self-validating
- Trade-off: every
docker buildruns the full test suite, which makes builds slower. For large test suites, keeping tests in a separate CI stage gives you more control and better caching
Use CI pipeline test stage when you want fast feedback loops, parallel jobs, and cached node_modules. Use Docker multi-stage tests when you want a single self-contained build artifact that is guaranteed to have passed tests — useful when the same Dockerfile is used in multiple environments and you cannot guarantee a CI pipeline runs before it.
Container Networking
When your frontend needs to call a backend API that also runs in Docker, both containers need to be on the same Docker network. Docker Compose handles this automatically – all services in the same docker-compose.yml can reach each other by service name.
services:
  frontend:
    build: ./frontend
    ports:
      - "80:80"

  api:
    build: ./backend
    ports:
      - "3000:3000"
In this setup, the frontend nginx can proxy API requests to http://api:3000 using the service name as hostname.
Defence Preparation
Be prepared to explain topics like these:
- What is the difference between a Docker image and a Docker container? — An image is a read-only template containing your application, its dependencies, and configuration. A container is a running instance of an image. You can create multiple containers from the same image. Think of an image as a class and a container as an object — the image defines what exists, the container is a live process created from that definition.
- Why use multi-stage Docker builds instead of building locally and copying the
distfolder? — Multi-stage builds ensure reproducible builds regardless of the developer's local environment — everyone gets the same Node.js version, the samenpm cioutput, and the same build result. They also keep the final image small because only the built output is copied to the nginx stage. Without multi-stage builds, you must trust that every developer (and the CI server) has the correct Node.js version and dependencies installed. - Why do SPAs need special server configuration (like
try_filesin nginx) for client-side routing? — SPAs have only one real HTML file (index.html). When a user navigates to/dashboard/settingsand hits refresh, the browser sends that URL to the server. Without configuration, nginx looks for a file at/dashboard/settings, finds nothing, and returns 404. Thetry_files $uri $uri/ /index.htmldirective tells nginx to serveindex.htmlfor any URL that doesn't match a real file, letting the JavaScript router handle the path on the client side. - What is the difference between build-time and runtime environment variables in frontend apps? Why can't you change
VITE_API_URLafter the build? — Frontend apps are compiled into static JavaScript files. During the build, tools like Vite find every reference toimport.meta.env.VITE_API_URLand replace it with the literal string value from the environment. After build, these values are hardcoded into the JavaScript bundle. Changing an environment variable on the server has no effect because the value is already baked into the files that were shipped to the browser. - Explain the CI/CD pipeline stages (build → test → deploy). What happens if the test stage fails? — The build stage installs dependencies and compiles the application. The test stage runs automated tests (e.g.,
npx vitest run) against the compiled code. The deploy stage packages the application into a Docker container and starts it. If the test stage fails, the pipeline stops — the deploy stage never executes, so broken code never reaches production. This is the entire point of CI: catching problems automatically before they affect users. - Why do tests run in the CI pipeline against source code in Node.js, not inside the final Docker container? — The final Docker container only contains static HTML/CSS/JS files served by nginx. There is no Node.js, no test runner, and no test files inside it — those would be wasted space in production. Tests need Node.js, Vitest, jsdom, and your test files, so they run in a separate stage (or a build stage of Docker) where Node.js is available. Once tests pass, the build output is copied to the clean nginx image.
- What are the two approaches to running tests in a Docker-based deployment (CI test stage vs Docker multi-stage)? What are the trade-offs? — In a CI test stage, tests run as a separate pipeline job with their own caching and artifacts. This is faster for iteration because you can re-run just the test stage. In a Docker multi-stage build, tests run inside the Dockerfile itself — if they fail, the image build fails. This is simpler to set up and guarantees the image was tested, but makes every build slower since tests cannot be cached separately.
- How does Docker Compose networking work? How can an nginx frontend proxy requests to a backend API running in another container? — Docker Compose creates a shared network for all services defined in the same
docker-compose.yml. Each service is reachable by its service name as a hostname. So if you have a service namedapi, the frontend nginx can proxy requests tohttp://api:3000. This works because Docker's internal DNS resolves the service name to the container's IP address on the shared network. - What is a GitLab Runner and why does it need to be on the same machine as your Docker deployment? — A GitLab Runner is a program that picks up CI/CD jobs from GitLab and executes them. In our setup, the runner is installed on the VPS where we deploy. This is necessary because the deploy step runs
docker compose up— it needs direct access to the Docker daemon on the machine where containers will run. The runner uses a shell executor, meaning it runs pipeline commands directly on the VPS as shell commands. - What does code coverage tell you, and why is it useful to generate coverage reports in CI? — Code coverage measures which lines, branches, and functions were executed during tests. Generating it in CI means every push gets a coverage report, so the team can track whether test coverage is improving or declining over time. However, coverage does not measure the quality of assertions — a test that runs code but checks nothing still counts as covered. Use it as a tool to find untested code paths, not as a quality guarantee.
Enos - historical
In order to upload your files to enos.itcollege.ee, you can use some FTP client e.g. FileZilla (MacOS Intel/Windows) or Cyberduck (MacOS Intel & apple silicon/Windows).
Choose SFTP (Secure FTP)

+ new connection

server: enos.itcollege.ee
port: 22
username: your_uni_id
password: your_uni_id_password

add to keychain (SFTP uses SSH for secure transfer)

you might be prompted to add new key to known hosts folder
Uploading your files
- Locate home folder
- Find folder with your uni_id name
- Find public_html folder.
- Add a new folder inside public_html indicating the course or project name. E.g.
js-project - Upload your files to this folder.
Viewing files on the web
The link to view your public files is: https://enos.itcollege.ee/~your_uni_id/
If you have an index.html file somewhere in the folder then this will be displayed instead of the default folder file structure.
History mode
Add .htaccess file to your subdir to enable HTML5 history mode (instead of 404 on non-existing file, the request is directed to /subdir/index.html).
<IfModule mod_rewrite.c>
RewriteEngine On
RewriteBase /subdirectoryName
RewriteRule ^subdirectoryName/index\.html$ - [L]
RewriteCond %{REQUEST_FILENAME} !-f
RewriteCond %{REQUEST_FILENAME} !-d
RewriteRule . /subdirectoryName/index.html [L]
</IfModule>
Enos itcollege wiki
Possibly outdated!
Read additionally official itcollege wiki on enos topic. In more detail and pictures.