Angular
The framework for building scalable web apps with confidence.
Promo talk
Angular includes:
- A component-based framework for building scalable web applications
- A collection of well-integrated libraries that cover a wide variety of features, including routing, forms management, client-server communication, and more
- A suite of developer tools to help you develop, build, test, and update your code
With Angular, you're taking advantage of a platform that can scale from single-developer projects to enterprise-level applications.
Unlike React (library + ecosystem) or Vue (progressive framework), Angular is an opinionated, batteries-included framework — routing, forms, HTTP, DI, and testing are all built in.
Popularity
2024, Stack Overflow survey
- Popularity: React 39.5%, Angular 17.1%, Vue.js 15.4%, AngularJS 6.8%, Svelte 6.5%, Solid.js 1.2%
- Desired: React 33.4%, Vue.js 16.3%, Angular 13.9%, Svelte 11.5%, AngularJS 4.2%, Solid.js 3.6%
- Admired: Svelte 72.8%, Solid.js 67%, React 62.2%, Vue.js 60.2%, Angular 53.4%, AngularJS 23.1%
Angular trails React and Vue in popularity, but its comprehensive nature makes it a preferred choice for complex, large-scale enterprise applications.
Install Angular CLI (and Node)
npm install -g @angular/cli


# check install
ng v
Install in VS Code - Angular Language Service
Create new project
ng new angulartest01 --inline-style --inline-template --skip-tests
cd angulartest01
code .
## start up
ng dev
- src/app - main component, routes and config
- index.html, styles.css and main.ts - Angular bootstrapper
Angular components
Every component has three parts:
- template - HTML
- code in TypeScript
- styles (local, encapsulated)
Angular 19+ uses standalone components by default — no NgModules needed. Each component declares its own dependencies in the imports: [] array of @Component. This is similar to how Vue SFCs and React components work — each component is self-contained.
import { Component } from '@angular/core';
import { RouterOutlet } from '@angular/router';

@Component({
  selector: 'app-root',
  imports: [RouterOutlet],
  template: `
    <h1>Welcome to {{title}}!</h1>

    <router-outlet />
  `,
  styles: [],
})
export class AppComponent {
  title = 'angulartest01';
}
If you would like separate CSS and HTML files - do not use --inline-style --inline-template while creating new Angular app.
For external template add templateUrl with the relative address of this component's HTML template.
templateUrl: './counter-button.component.html',
First component
ng generate component components/header
import { Component } from '@angular/core';

@Component({
    selector: 'app-header',
    imports: [],
    template: `
    <p>
      header works!
    </p>
  `,
    styles: ``
})
export class HeaderComponent {

}
Use your component — add it to imports: [], and reference it in template with the selector <app-header/> defined in the component.
import { Component } from '@angular/core';
import { RouterOutlet } from '@angular/router';
import { HeaderComponent } from './components/header/header.component';

@Component({
    selector: 'app-root',
    imports: [RouterOutlet, HeaderComponent],
    template: `
    <app-header />
    <h1>Welcome to {{title}}!</h1>

    <router-outlet />
  `,
    styles: [],
})
export class AppComponent {
    title = 'angulartest01';
}
String interpolation
{{expression}} — evaluates the expression and converts the result to a string.
import { Component } from '@angular/core';

@Component({
    selector: 'app-header',
    imports: [],
    template: `
    <p>
      header works! - {{title}}
    </p>
  `,
    styles: ``
})
export class HeaderComponent {
    title = 'First App';
}
Signals API — reactive state
Signals are Angular's recommended way to manage reactive data. A signal is a wrapper around a value that notifies consumers when the value changes.
Compare: Vue's ref() / React's useState() — same idea, different API.
import { Component, signal, computed, effect, OnDestroy } from '@angular/core';

@Component({
    selector: 'app-header',
    imports: [],
    template: `
    <p>header works! - {{title()}}</p>
    <p>Character count: {{titleLength()}}</p>
  `,
    styles: ``
})
export class HeaderComponent implements OnDestroy {
    title = signal<string>('First App - signal');
    titleLength = computed(() => this.title().length);
    private counter = 0;
    private timerId: ReturnType<typeof setInterval>;

    constructor() {
        effect(() => console.log('Title changed:', this.title()));

        this.timerId = setInterval(() => {
            this.counter++;
            this.title.set(`First App - updated ${this.counter}x`);
        }, 2000);
    }

    ngOnDestroy() {
        clearInterval(this.timerId);
    }
}
signal(value)— creates a writable signal. Read withsignal(), write withsignal.set(newValue)orsignal.update(prev => newValue).computed(() => expr)— derived signal that recalculates automatically when its dependencies change (read-only).effect(() => { ... })— runs a side effect whenever any signal it reads changes.
When to use Signals vs Observables: Signals are for synchronous, local state (counters, form state, UI toggles). Observables (RxJS) are for async streams (HTTP requests, WebSocket events, complex event composition).
Template syntax
{{someValue}} or {{someFunc()}} — string interpolation. Expression gets evaluated and result converted to string.
(click)="someMethod()" — event binding (template statements).
[someproperty]="expression" — property binding.
<button type="button" [disabled]="isUnchanged">Save</button>
Different ways to bind:
- one way, from data source to target
{{expression}}or[target]="expression" - one way, from view target to data source
(target)="statement" - two-way (bananas go inside the box...)
[(target)]="expression"
Compare: [(ngModel)] is Angular's equivalent of Vue's v-model.
Control flow
Built-in template syntax for conditional and repeated rendering.
Compare: Vue uses directives (v-if, v-for), React uses JSX expressions (&&, map()). Angular uses @if, @for, @switch blocks.
@if
@if (a > b) {
  {{a}} is greater than {{b}}
} @else if (b > a) {
  {{a}} is less than {{b}}
} @else {
  {{a}} is equal to {{b}}
}
@for
@for (item of items; track item.id) {
  {{ item.name }}
}
track is required — it tells Angular how to identify each item for efficient DOM updates (similar to Vue/React key).
@for block has implicit variables:
$count- Number of items in a collection iterated over$index- Index of the current row$first- Whether the current row is the first row$last- Whether the current row is the last row$even- Whether the current row index is even$odd- Whether the current row index is odd
Use @empty block when the collection is empty:
@for (item of items; track item.name) {
  <li> {{ item.name }}</li>
} @empty {
  <li aria-hidden="true"> There are no items. </li>
}
@switch
@switch (userPermissions) {
  @case ('admin') {
    <app-admin-dashboard />
  }
  @case ('reviewer') {
    <app-reviewer-dashboard />
  }
  @case ('editor') {
    <app-editor-dashboard />
  }
  @default {
    <app-viewer-dashboard />
  }
}
@switch does not have fallthrough — no break statement needed.
Note: Prior to Angular 17, structural directives
*ngIf,*ngFor,*ngSwitchwere used for this. These are deprecated in Angular 20 and will be removed in v22. You may encounter them in older codebases.
Component inputs and outputs
Components communicate via inputs (data in) and outputs (events out) — same pattern as Vue props/emits and React props/callbacks.
Counter button — with inputs/outputs
counter-button.component.ts:
import { Component, input, output } from '@angular/core';

@Component({
    selector: 'app-counter-button',
    imports: [],
    template: `
    <p>
      <button (click)="clickHandler($event)">{{label()}} {{value()}}</button>
    </p>
  `,
    styles: ``
})
export class CounterButtonComponent {
    label = input('Add +1: ');
    value = input(0);
    btnClicked = output();

    clickHandler(e: Event) {
        console.log("Button clicked", e);
        this.btnClicked.emit();
    }
}
Using it in app:
import { Component } from '@angular/core';
import { RouterOutlet } from '@angular/router';
import { HeaderComponent } from './components/header/header.component';
import { CounterButtonComponent } from "./components/counter-button/counter-button.component";

@Component({
    selector: 'app-root',
    imports: [RouterOutlet, HeaderComponent, CounterButtonComponent],
    template: `
    <app-header />
    <h1>Welcome to {{title}}!</h1>

    <app-counter-button label="Kala maja" (btnClicked)="btnClicked()" [value]="value"></app-counter-button>

    <router-outlet />
  `,
    styles: [],
})
export class AppComponent {
    title = 'angulartest01';

    value = 10;

    btnClicked() {
        console.log("Button clicked in app component");
        this.value++;
    }
}
Content projection (slot)
<ng-content> accepts markup from the parent and renders it inside the component. Same concept as Vue's <slot> and React's children.
@Component({
  selector: 'button[baseButton]',
  template: `
      <ng-content />
  `,
})
Services and Dependency Injection
Services encapsulate reusable logic (data access, business rules, shared state). Angular's DI container manages service creation and lifetime — similar to Vue's provide/inject but built into the framework.
Create a service
ng generate service services/counter
@Injectable registers the service with Angular's DI container. providedIn: 'root' makes it a singleton available app-wide.
Counter service example
counter.service.ts:
import { Injectable } from '@angular/core';

@Injectable({
  providedIn: 'root'
})
export class CounterService {

    counter = 0;

    increment() {
        this.counter++;
    }

    getCounter() {
        return this.counter;
    }

    reset() {
        this.counter = 0;
    }
}
Injecting services — inject() function
Use inject() to get service instances. This is the modern, preferred approach in Angular 19+.
Counter button — with service
counter-button.component.ts:
import { Component, inject, input } from '@angular/core';
import { CounterService } from '../../services/counter.service';

@Component({
    selector: 'app-counter-button',
    imports: [],
    template: `
    <p>
      <button (click)="clickHandler($event)">{{label()}} {{counterService.getCounter()}}</button>
    </p>
  `,
    styles: ``
})
export class CounterButtonComponent {

    counterService = inject(CounterService);

    label = input('Add +1: ');

    clickHandler(e: Event) {
        this.counterService.increment();
    }
}
app.component.ts:
import { Component, inject } from '@angular/core';
import { RouterOutlet } from '@angular/router';
import { HeaderComponent } from './components/header/header.component';
import { CounterButtonComponent } from "./components/counter-button/counter-button.component";
import { CounterService } from './services/counter.service';

@Component({
    selector: 'app-root',
    imports: [RouterOutlet, HeaderComponent, CounterButtonComponent],
    template: `
    <app-header />
    <h1>Welcome to {{title}}!</h1>

    <app-counter-button label="Kala maja" (btnClicked)="btnClicked()"></app-counter-button>

    Current counter: {{counterService.getCounter()}}

    <router-outlet />
  `,
    styles: [],
})
export class AppComponent {

    counterService = inject(CounterService);

    title = 'angulartest01';

    btnClicked() {
        console.log("Button clicked in app component");
    }
}
Legacy syntax: You may see constructor-based injection in older code:
constructor(public counterService: CounterService) { }. Both work, butinject()is preferred in Angular 19+.
Forms
Two approaches — reactive and template-driven.
Template-driven forms
Simpler approach using directives in the template. Good for basic forms.
import { Component } from '@angular/core';
import { FormsModule } from '@angular/forms';
@Component({
  imports: [FormsModule],
  template: `
    <main>
      <h2>Hello {{ name }}!</h2>
      <input type="text" [(ngModel)]="name" />
    </main>
  `
})
export class AppComponent {
  name = 'Andres Käver';
}
Reactive forms
Provide direct, explicit access to the underlying form's object model. More scalable, reusable, and testable. Recommended when forms are a key part of your application.
Basic example:
import {Component} from '@angular/core';
import {FormControl, ReactiveFormsModule} from '@angular/forms';
@Component({
  selector: 'app-reactive-favorite-color',
  template: `
    Favorite Color: <input type="text" [formControl]="favoriteColorControl">
  `,
  imports: [ReactiveFormsModule],
})
export class FavoriteColorReactiveComponent {
  favoriteColorControl = new FormControl('');
}
With FormGroup and validation:
import { Component } from '@angular/core';
import { FormControl, FormGroup, Validators, ReactiveFormsModule } from '@angular/forms';

@Component({
  imports: [ReactiveFormsModule],
  template: `
    <form [formGroup]="profileForm" (ngSubmit)="onSubmit()">
      <label>Name: <input formControlName="name" /></label>
      @if (profileForm.get('name')?.invalid && profileForm.get('name')?.touched) {
        <span>Name is required</span>
      }

      <label>Email: <input formControlName="email" /></label>
      @if (profileForm.get('email')?.invalid && profileForm.get('email')?.touched) {
        <span>Valid email is required</span>
      }

      <button type="submit" [disabled]="profileForm.invalid">Submit</button>
    </form>
  `,
})
export class ProfileFormComponent {
  profileForm = new FormGroup({
    name: new FormControl('', Validators.required),
    email: new FormControl('', [Validators.required, Validators.email]),
  });

  onSubmit() {
    console.log(this.profileForm.value);
  }
}
Reactive forms — Data model is structured and immutable. Scalable and testable. Use for complex forms. Template-driven forms — Data model is unstructured and mutable. Simple to set up. Use for basic forms (login, signup).
Attribute directives
NgClass- Adds and removes a set of CSS classes.NgStyle- Adds and removes a set of HTML styles.NgModel- Adds two-way data binding to an HTML form element.
<!-- toggle the "special" class on/off with a property -->
<div [ngClass]="isSpecial ? 'special' : ''">This div is special</div>
Pipes
Pipes transform data declaratively in templates. You declare a transformation once and reuse it. Angular pipes use the vertical bar character (|), inspired by the Unix pipe.
Built in pipes:
- AsyncPipe - Read the value from a Promise or an RxJS Observable.
- CurrencyPipe - Transforms a number to a currency string, formatted according to locale rules.
- DatePipe - Formats a Date value according to locale rules.
- DecimalPipe - Transforms a number into a string with a decimal point, formatted according to locale rules.
- I18nPluralPipe - Maps a value to a string that pluralizes the value according to locale rules.
- I18nSelectPipe - Maps a key to a custom selector that returns a desired value.
- JsonPipe - Transforms an object to a string representation via JSON.stringify, intended for debugging.
- KeyValuePipe - Transforms Object or Map into an array of key value pairs.
- LowerCasePipe - Transforms text to all lower case.
- PercentPipe - Transforms a number to a percentage string, formatted according to locale rules.
- SlicePipe - Creates a new Array or String containing a subset (slice) of the elements.
- TitleCasePipe - Transforms text to title case.
- UpperCasePipe - Transforms text to all upper case.
<p>Birthday: {{ birthday | date:'fullDate' }}</p>
<p>Price: {{ amount | currency:'EUR' }}</p>
<p>Debug: {{ someObject | json }}</p>
Routing
Define routes in app.routes.ts:
import {Routes} from '@angular/router';
import {HomeComponent} from './home/home.component';
export const routes: Routes = [
{
    path: '',
    title: 'App Home Page',
    component: HomeComponent,
},
];
Use routerLink for navigation:
import { RouterLink, RouterOutlet } from '@angular/router';
@Component({
  ...
  template: `
    ...
    <a routerLink="/">Home</a>
    <a routerLink="/user">User</a>
    ...
  `,
  imports: [RouterLink, RouterOutlet],
})
HTTP requests
Angular uses HttpClient for HTTP requests. Unlike Axios (used in Vue lectures), HttpClient returns RxJS Observables.
Basic service with HttpClient
@Injectable({providedIn: 'root'})
export class UserService {
  private http = inject(HttpClient);

  getUser(id: string): Observable<User> {
    return this.http.get<User>(`/api/user/${id}`);
  }
}
Using in a component with async pipe
import { AsyncPipe } from '@angular/common';
@Component({
  imports: [AsyncPipe],
  template: `
    @if (user$ | async; as user) {
      <p>Name: {{ user.name }}</p>
      <p>Biography: {{ user.biography }}</p>
    }
  `,
})
export class UserProfileComponent {
  @Input() userId!: string;
  user$!: Observable<User>;
  private userService = inject(UserService);
  constructor() {
    this.user$ = this.userService.getUser(this.userId);
  }
}
Error handling
import { catchError, of } from 'rxjs';

getUser(id: string): Observable<User | null> {
  return this.http.get<User>(`/api/user/${id}`).pipe(
    catchError(error => {
      console.error('Failed to fetch user:', error);
      return of(null);
    })
  );
}
Observable pattern (RxJS) — Reactive programming
Angular uses RxJS Observables for async operations. The Observer pattern defines a one-to-many relationship — when the subject changes state, all observers are notified automatically.
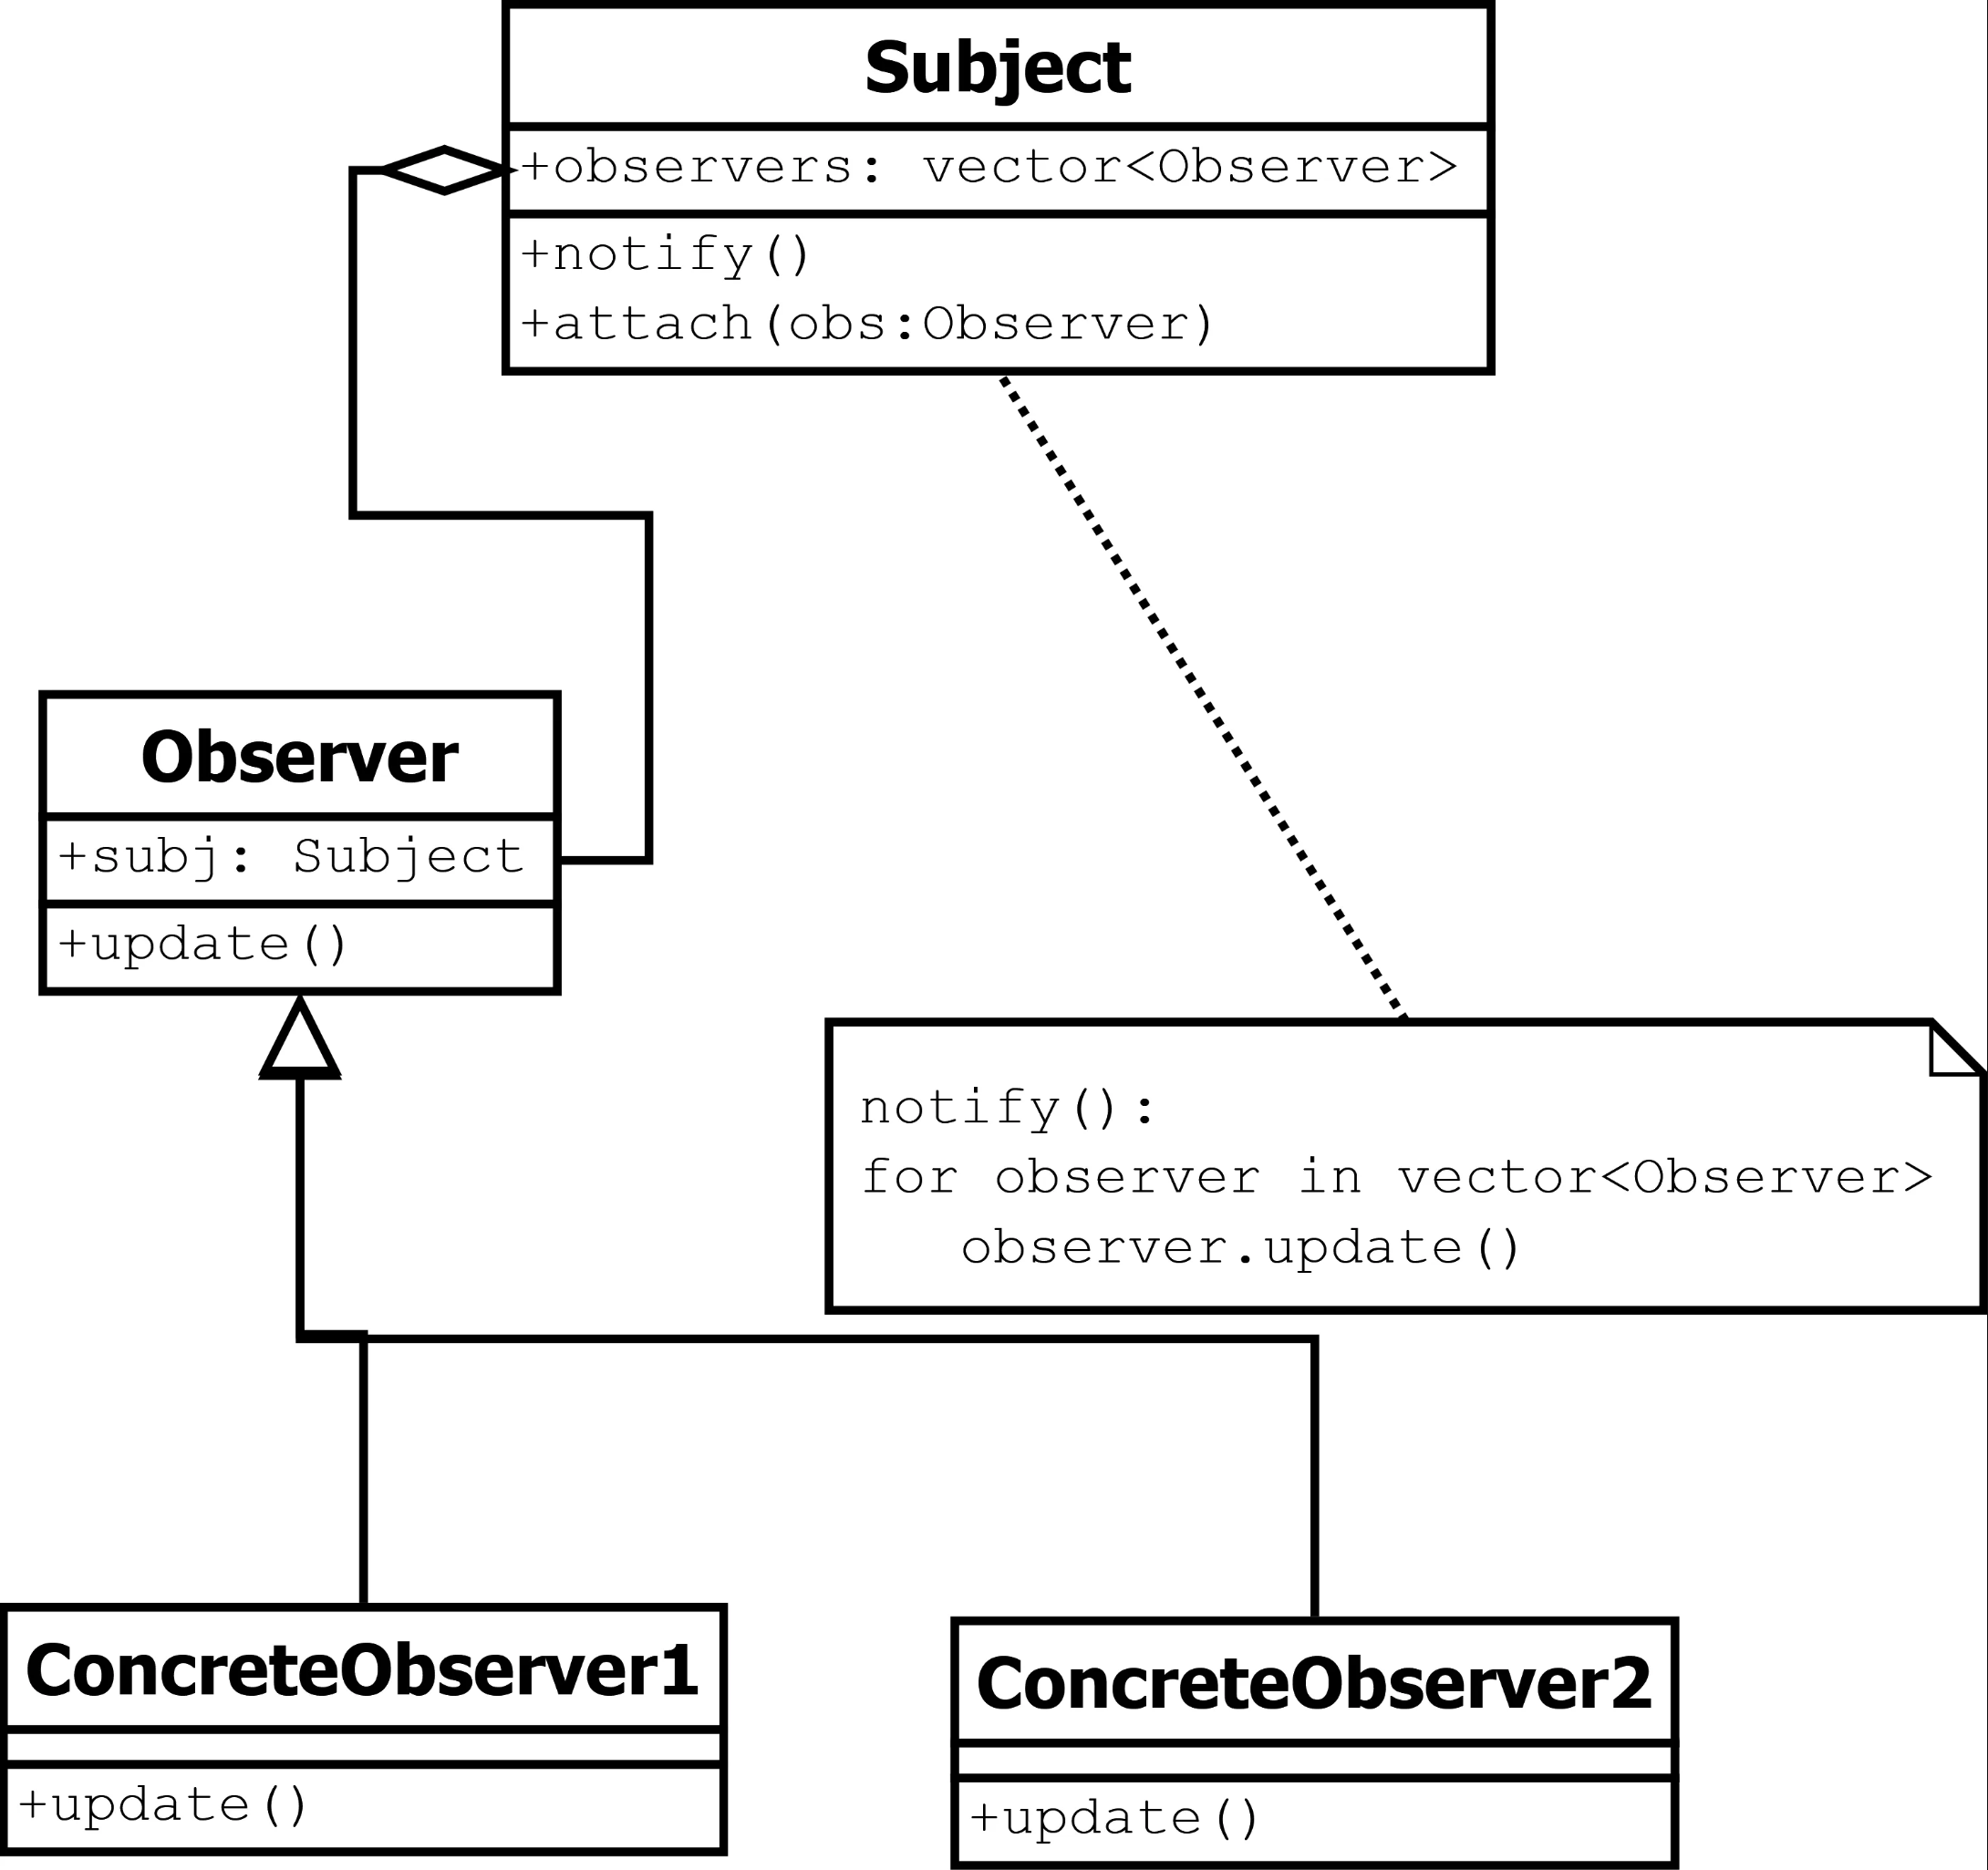
- Subject: Keeper of data or business logic.
- Register/Attach: Observers subscribe to the subject to receive notifications.
- Event: A trigger that notifies all observers.
- Notify: The subject pushes information to observers (or observers pull).
- Update: Observers update their state independently based on the event.
Key RxJS concepts:
Observable— a stream of values over time (similar to a Promise, but can emit multiple values)subscribe()— starts listening to the Observablepipe()— chains operators to transform the stream- Common operators:
map(),filter(),switchMap(),catchError(),tap()
Subscription cleanup: Manual .subscribe() calls create subscriptions that must be cleaned up when the component is destroyed to avoid memory leaks. Use the async pipe in templates when possible (it auto-unsubscribes), or use takeUntilDestroyed() for imperative subscriptions:
import { DestroyRef, inject } from '@angular/core';
import { takeUntilDestroyed } from '@angular/core/rxjs-interop';

export class MyComponent {
    private destroyRef = inject(DestroyRef);

    ngOnInit() {
        this.someService.getData().pipe(
            takeUntilDestroyed(this.destroyRef)
        ).subscribe(data => {
            // handle data
        });
    }
}
Full example — JWT authentication
Account service
account.service.ts:
import { inject, Injectable } from '@angular/core';
import { HttpClient } from '@angular/common/http';
import { Observable } from 'rxjs';

export interface IJwtResponse {
    jwt: string;
    refreshToken: string;
}

@Injectable({
    providedIn: 'root'
})
export class AccountService {

    private apiUrl = 'http://localhost:5171/api/v1/account/';
    private httpClient = inject(HttpClient);

    login(email: string, password: string): Observable<IJwtResponse> {
        return this.httpClient.post<IJwtResponse>(this.apiUrl + 'login', {email, password});
    }

    setJwt(jwt: IJwtResponse) {
        localStorage.setItem('jwt', JSON.stringify(jwt));
    }

    getJwt(): string | null {
        let jwt = localStorage.getItem('jwt');
        if (jwt) {
            let jwtData: IJwtResponse = JSON.parse(jwt);
            return jwtData.jwt;
        }
        return null;
    }

    isAuthenticated(): boolean {
        return localStorage.getItem('jwt') !== null;
    }

    logout() {
        localStorage.removeItem('jwt');
    }
}
Routing guard
auth.guard.ts:
import { inject } from '@angular/core';
import { CanActivateFn, Router } from '@angular/router';
import { AccountService } from '../services/account.service';

export const authGuard: CanActivateFn = (route, state) => {
    const authToken = inject(AccountService).isAuthenticated();
    const router = inject(Router);

    if (authToken) return true;

    return router.navigate(['login']);
};
Routes with guard
app.routes.ts:
import { Routes } from '@angular/router';
import { HomeComponent } from './components/home/home.component';
import { LoginComponent } from './components/login/login.component';
import { DataComponent } from './components/data/data.component';
import { authGuard } from './guards/auth.guard';

export const routes: Routes = [
    {
        path: '',
        title: 'App Home Page',
        component: HomeComponent,
    },
    {
        path: 'login',
        title: 'Login',
        component: LoginComponent,
    },
    {
        path: 'data',
        title: 'Data',
        component: DataComponent,
        canActivate: [authGuard]
    },
];
HTTP interceptor
jwt.interceptor.ts:
import { HttpInterceptorFn } from '@angular/common/http';
import { inject } from '@angular/core';
import { AccountService } from '../services/account.service';

export const jwtInterceptor: HttpInterceptorFn = (req, next) => {
    const authToken = inject(AccountService).getJwt();

    if (authToken) {
        const authReq = req.clone({
            headers: req.headers.set('Authorization', `Bearer ${authToken}`),
        });
        return next(authReq);
    }

    return next(req);
};
App configuration
app.config.ts:
import { ApplicationConfig, provideZoneChangeDetection } from '@angular/core';
import { provideRouter } from '@angular/router';
import { routes } from './app.routes';
import { provideHttpClient, withInterceptors } from '@angular/common/http';
import { jwtInterceptor } from './interceptors/jwt.interceptor';

export const appConfig: ApplicationConfig = {
  providers: [
    provideHttpClient(withInterceptors([jwtInterceptor])),
    provideZoneChangeDetection({ eventCoalescing: true }),
    provideRouter(routes)
  ]
};
Login component
login.component.ts:
import { Component, inject } from '@angular/core';
import { AsyncPipe } from '@angular/common';
import { FormsModule } from '@angular/forms';
import { AccountService, IJwtResponse } from '../../services/account.service';
import { Observable } from 'rxjs';
import { Router } from '@angular/router';

@Component({
    selector: 'app-login',
    imports: [FormsModule, AsyncPipe],
    template: `
    <h1>Login</h1>
    <form (submit)="login()">
      <div class="mb-3">
        <label for="username" class="form-label">Username</label>
        <input [(ngModel)]="username" name="username" type="text" class="form-control" id="username" placeholder="Enter username">
      </div>
      <div class="mb-3">
        <label for="password" class="form-label">Password</label>
        <input [(ngModel)]="password" name="password" type="password" class="form-control" id="password" placeholder="Enter password">
      </div>
      <button type="submit" class="btn btn-primary">Login</button>
    </form>

    @if (data$ | async; as data) {
        <ul>
            <li>jwt - {{data.jwt}}</li>
            <li>rt - {{data.refreshToken}}</li>
        </ul>
    }
  `,
    styles: ``
})
export class LoginComponent {
    username: string = 'user@taltech.ee';
    password: string = 'Foo.Bar.2';

    private accountService = inject(AccountService);
    private router = inject(Router);

    data$!: Observable<IJwtResponse>;

    login() {
        console.log('submitted', this.username, this.password);
        if (this.username && this.password) {
            this.data$ = this.accountService.login(this.username, this.password);
            this.data$.subscribe(jwt => {
                console.log("got jwt", jwt);
                this.accountService.setJwt(jwt);
                this.router.navigate(['/data']);
            });
        }
    }
}
CSS frameworks (optional)
ng-bootstrap
ng add @ng-bootstrap/ng-bootstrap
Restart dev server afterwards.
Tailwind CSS
Defence Preparation
Be prepared to explain topics like these:
- How does Angular's philosophy differ from Vue and React? What does "batteries-included" mean? — Angular is an opinionated, full framework that provides built-in solutions for routing, forms, HTTP, dependency injection, animations, and testing. Vue and React are view libraries — they handle the component layer and leave routing, state management, and HTTP to community libraries. "Batteries-included" means you don't choose between competing packages for each concern; Angular ships everything in one coordinated set with consistent APIs and documentation.
- What are Angular signals, and how do they differ from RxJS observables? — Signals (
signal(),computed(),effect()) are a synchronous, pull-based reactivity system for local component state. They hold a current value that you read by calling the signal function. Observables are asynchronous, push-based streams that emit values over time and are ideal for HTTP responses, WebSocket messages, and event streams. Use signals for local UI state and simple derived values. Use observables for async data streams, complex event composition, and anything that involves timing operators. - What is the difference between template-driven and reactive forms in Angular? — Template-driven forms use
[(ngModel)]in the template and are quick to set up for simple forms — Angular infers the form model from the template. Reactive forms define the form model explicitly in TypeScript usingFormControl,FormGroup, andValidators, giving you programmatic control over validation, dynamic fields, and testing. Reactive forms are recommended for complex forms because the logic is testable, the structure is explicit, and you can react to value changes with observables. - How does dependency injection work in Angular? What does
providedIn: 'root'mean? — Dependency injection (DI) is a design pattern where a class receives its dependencies from an external source rather than creating them itself. In Angular, you mark a class with@Injectable()and Angular's injector creates and provides instances when requested.providedIn: 'root'registers the service as a singleton at the application level — one instance shared everywhere. Components request services withinject(ServiceName)and Angular resolves them automatically. - What are Angular pipes, and when would you use them instead of methods or computed values? — Pipes are template-level data transformations applied with the
|syntax:{{ price | currency:'EUR' }}. Built-in pipes includeDatePipe,CurrencyPipe,AsyncPipe,JsonPipe, and more. Pure pipes are cached and only re-evaluate when their input changes. Use pipes for display formatting in templates. Use methods or computed signals for logic that affects component behavior. TheAsyncPipeis especially useful — it subscribes to an Observable and handles unsubscription automatically. - How does Angular's new control flow syntax (
@if,@for) differ from the legacy structural directives (*ngIf,*ngFor)? — The new control flow syntax (Angular 17+) uses@if,@for,@switchblocks built into the template compiler. They are easier to read, support@elsedirectly, require atrackexpression for@for(improving performance), and provide implicit variables ($index,$first,$last). The legacy*ngIfand*ngFordirectives required importing modules and had less intuitive syntax for else conditions. Legacy directives are deprecated in Angular 20 and will be removed in Angular 22. - How does
HttpClientwork with observables? Why does every HTTP method return an Observable instead of a Promise? —HttpClient.get(),.post(), etc. return cold observables — the HTTP request is not sent until something subscribes. This gives you powerful composition: you can retry on failure, cancel in-flight requests withswitchMap, combine multiple requests, or apply timing operators. TheAsyncPipein templates subscribes and unsubscribes automatically, preventing memory leaks. If you prefer promises, you can convert withfirstValueFrom(). - What are common RxJS operators, and what problems do they solve? —
map()transforms emitted values (like array map).filter()only passes values that meet a condition.switchMap()cancels the previous inner observable when a new value arrives — essential for search-as-you-type (cancel old API call when user types again).catchError()handles errors without breaking the stream.tap()performs side effects (logging, state updates) without modifying the value.takeUntilDestroyed()auto-unsubscribes when the component is destroyed. - How does Angular's auth guard pattern work? What is
CanActivateFn? —CanActivateFnis a function-based route guard that runs before a route is activated. It receives the route and state, checks a condition (usuallyaccountService.isAuthenticated()), and returnstrueto allow navigation or aUrlTree/falseto redirect or block. Guards are registered in the route configuration:{ path: 'admin', canActivate: [authGuard], component: AdminComponent }. This centralizes access control instead of checking auth inside every protected component.